Banner Self-Service 9 Registration
How to Access Banner Self-Service 9 Registration
- Go to myusf.usfca.edu and click the Log In button.
- Enter your username and password.
- Click on View All Apps.
- Click on Banner Self-Service (Student).
- From the Student Services landing page, locate and click the Registration Landing Page link. Alternatively, you may click on the Banner (four-square) menu icon in the upper left corner. Click on Banner → Student → Registration → Registration Landing Page.
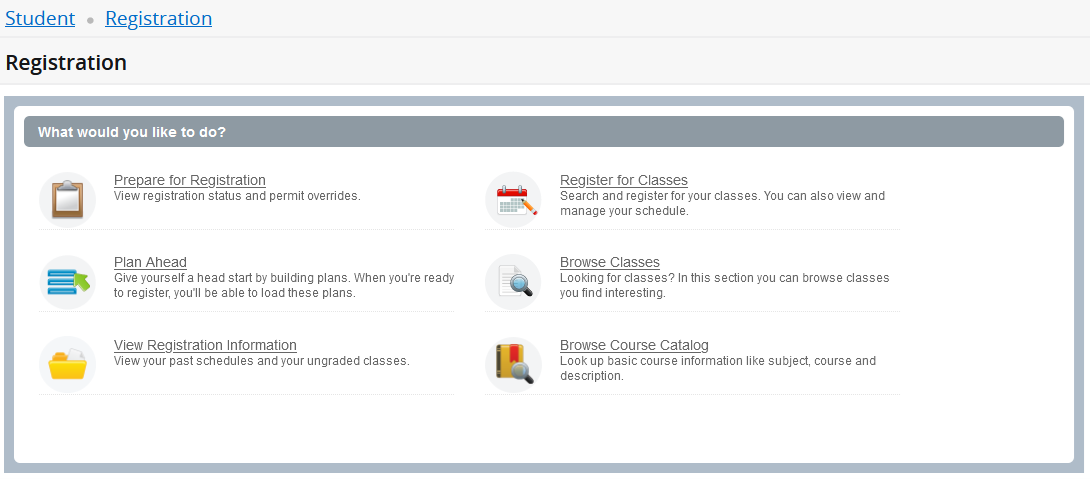
Welcome to the Registration landing page!
Here, you can view your registration status, create registration plans, browse the Schedule of Classes, and register for classes. See below for more information.
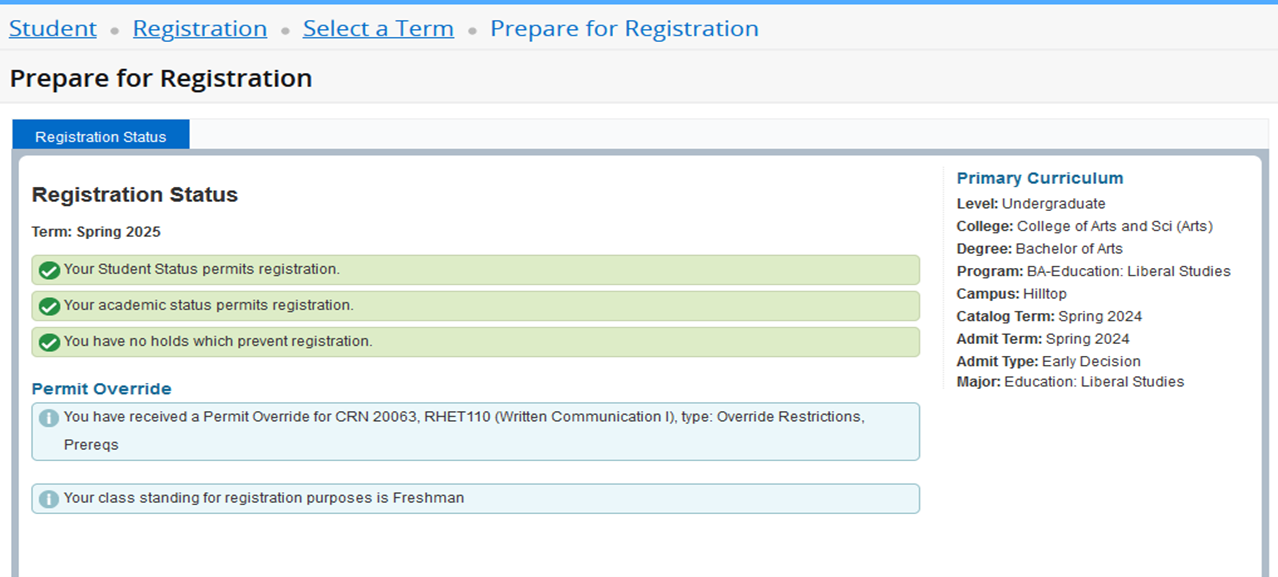
This page will display whether or not you have any restrictions that will prevent you from registering for classes. This page will also display any permits that have been entered for you, the number of earned hours, and class standing for registration purposes.
Registration Access Times
View your registration access time on the Student Profile. Navigate to the Student Profile by performing the following:
- Click on the Banner (four-square) menu icon in the upper left corner.
- Click on Banner → Student → Student Records → Student Profile.
- Above your photo, change the term, if needed.
- In the left panel, click on Registration Access Times. Your registration start day and time will display for the selected term.
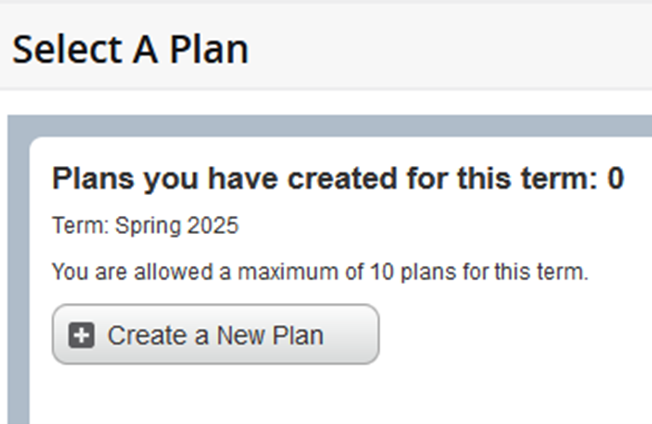
Use Plan Ahead to create registration plans prior to your registration access time. Students can create up to 10 registration plans and register for classes using a registration plan.
How to Create a Registration Plan
- Click on Plan Ahead.

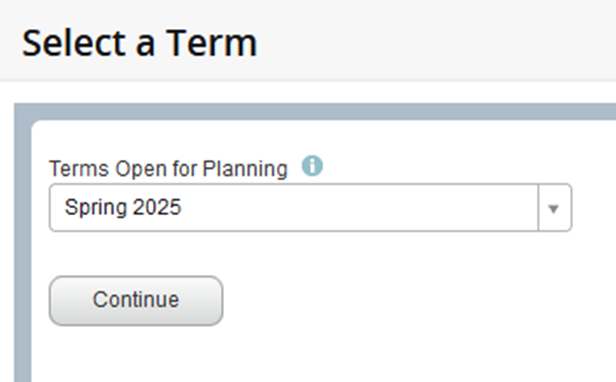
- Select a term and click Continue.
- Click on Create a New Plan.
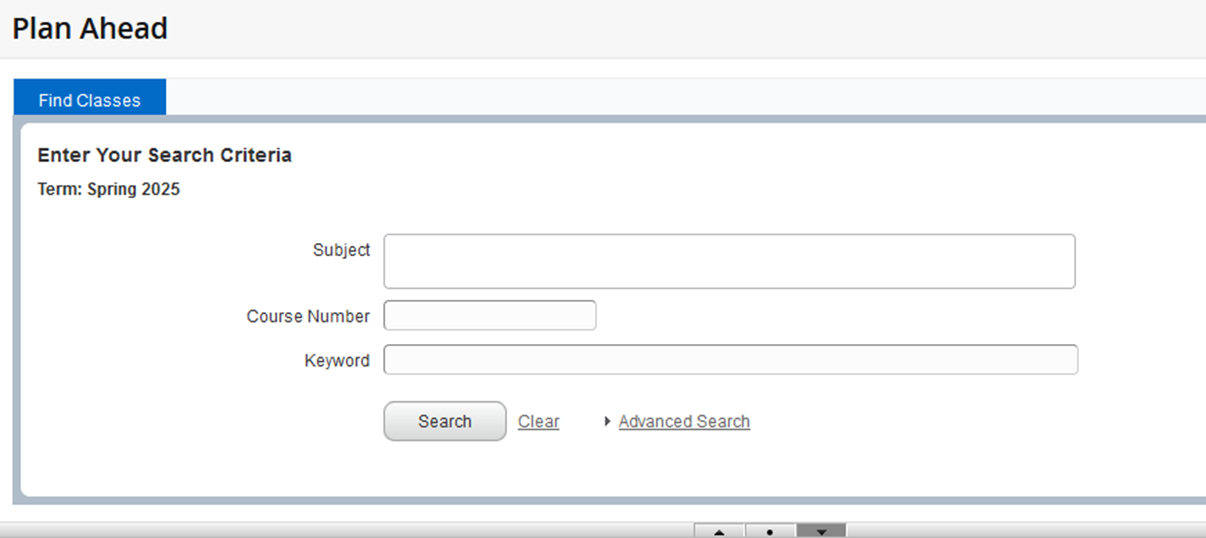
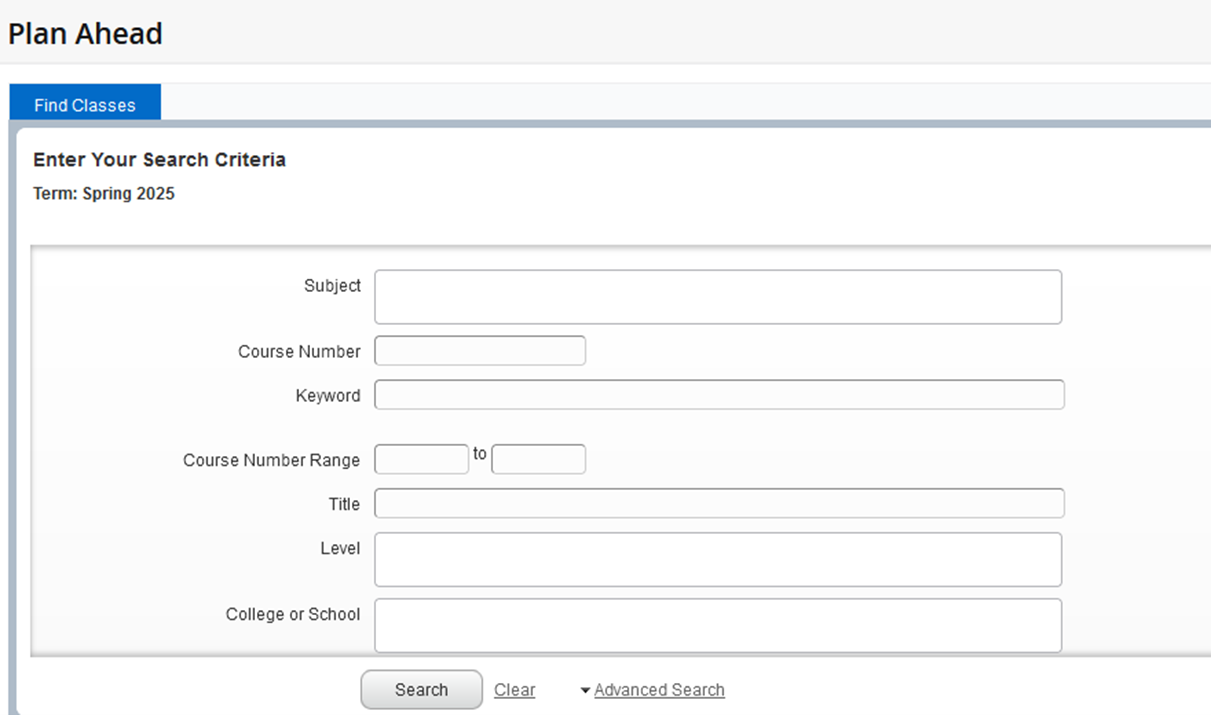
- The Find Classes tab displays basic search criteria of Subject, Course Number, and Keyword. If you need more search criteria, click the Advanced Search link.
Basic Search View
Advanced Search View
Notes:
- The Find Classes function in Plan Ahead performs a search for courses at the catalog (or course) level. In the search results, students can choose one of the following options:
- View sections offered for the term and add a section to the registration plan
- Add the course (without a specified section) to the registration plan.
- Sections of a course may not be offered for the term. Therefore, we advise students to select View Sections to see if sections are being offered for the term.
- The Find Classes function in Plan Ahead performs a search for courses at the catalog (or course) level. In the search results, students can choose one of the following options:
- Enter your search criteria and click the Search button.
- The Search Results will produce a list of all active courses at the catalog level for the term.
- The course list will be displayed in ascending order by Subject and Course Number. To change the sort order, use the up and down arrows next to the title in the column heading.
- Use the gear in the right corner of the Search Results view to hide columns.
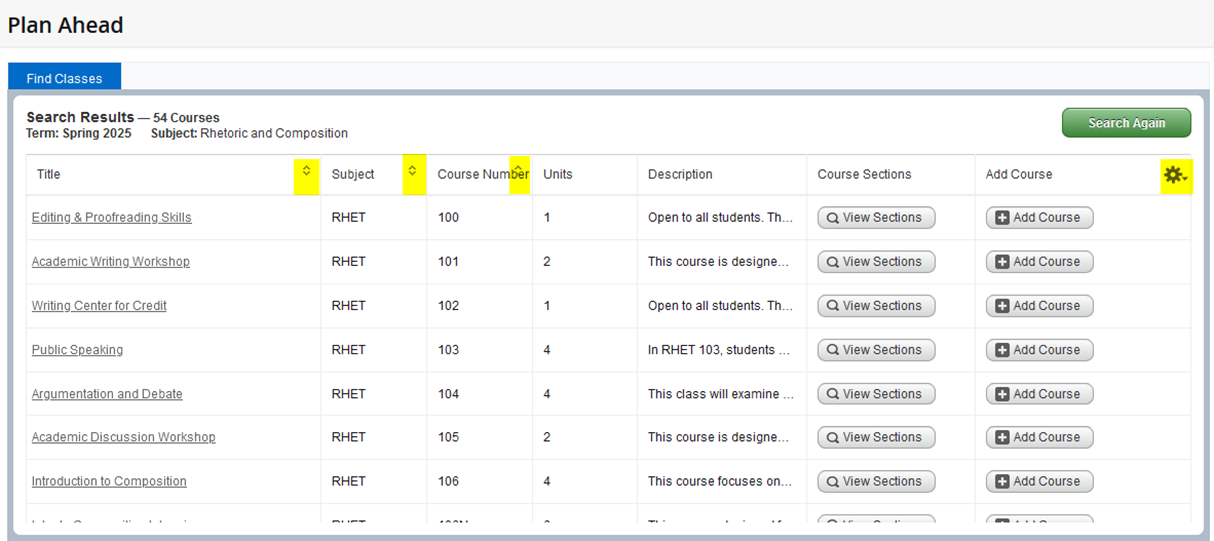
- To see if sections are offered for the term, click the View Sections button.
IMPORTANT NOTE: For the following examples, we use TEST data. The examples DO NOT reflect the actual course section offerings for the Spring 2025 term.
In the example below, there are no RHET 100 sections offered for the Spring 2025 term. Click the Catalog Search Results button to return to the Search Results page.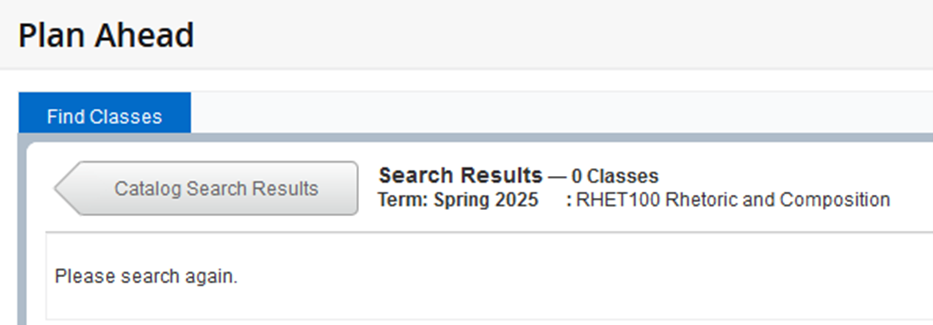
In the next example below, there are 22 RHET 103 sections offered for the Spring 2025 term. The first three sections appear in the screenshot.- The course list will be displayed in ascending order by Subject, Course Number, and Section. To change the sort order, use the up and down arrows next to the title in the column heading.
- To see course section details, click the course title in the Title column.
- Click the instructor’s name to view the Faculty Contact Card.
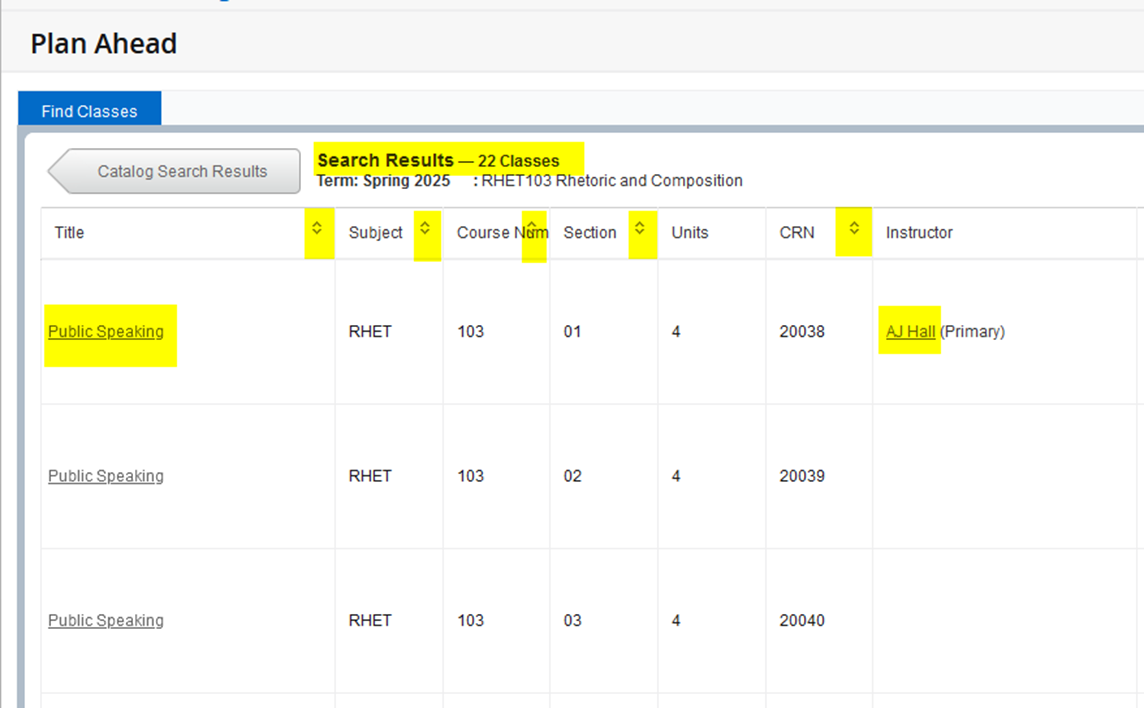
- Use the gear in the right corner of the Search Results view to hide columns.
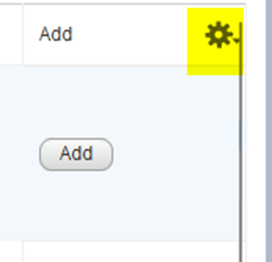
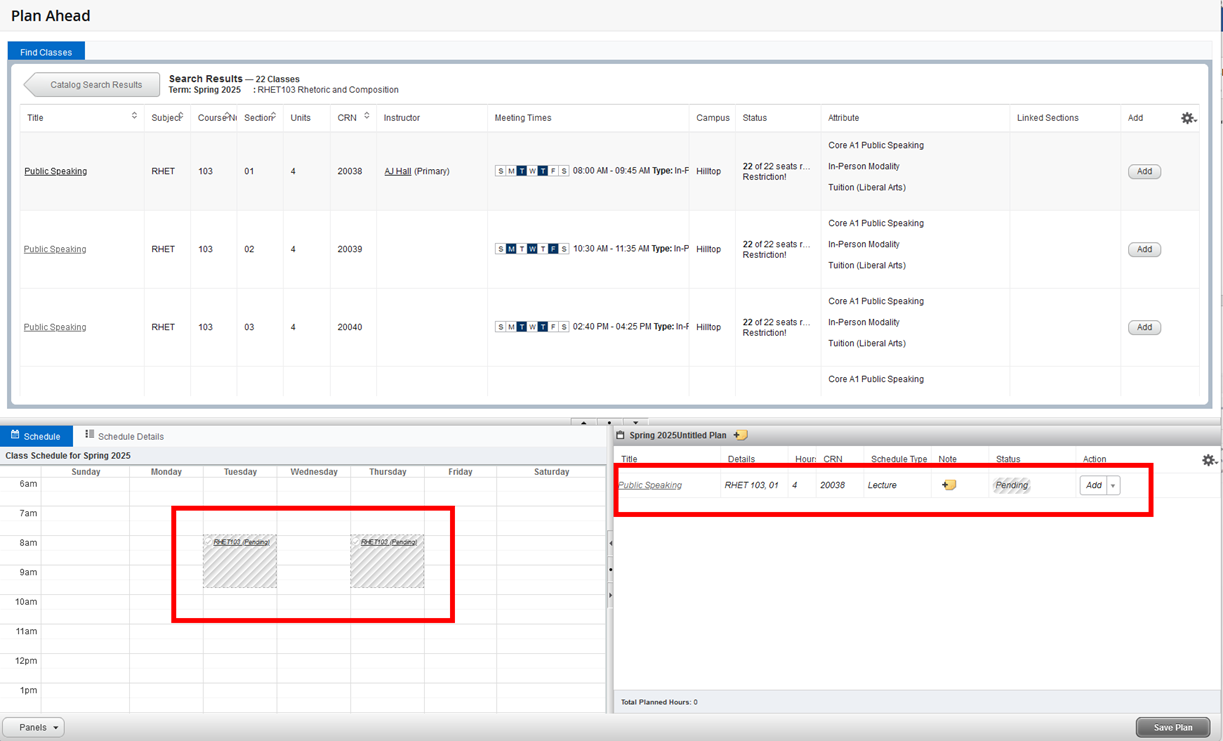
- Add a course section to the registration plan by clicking the Add button.

- The course section will be displayed below the Find Classes panel with a status of Pending.
- To add more course sections to the plan, click the Catalog Search Results button and then the Search Again button. Repeat steps 5-9 to add another course section to the registration plan.
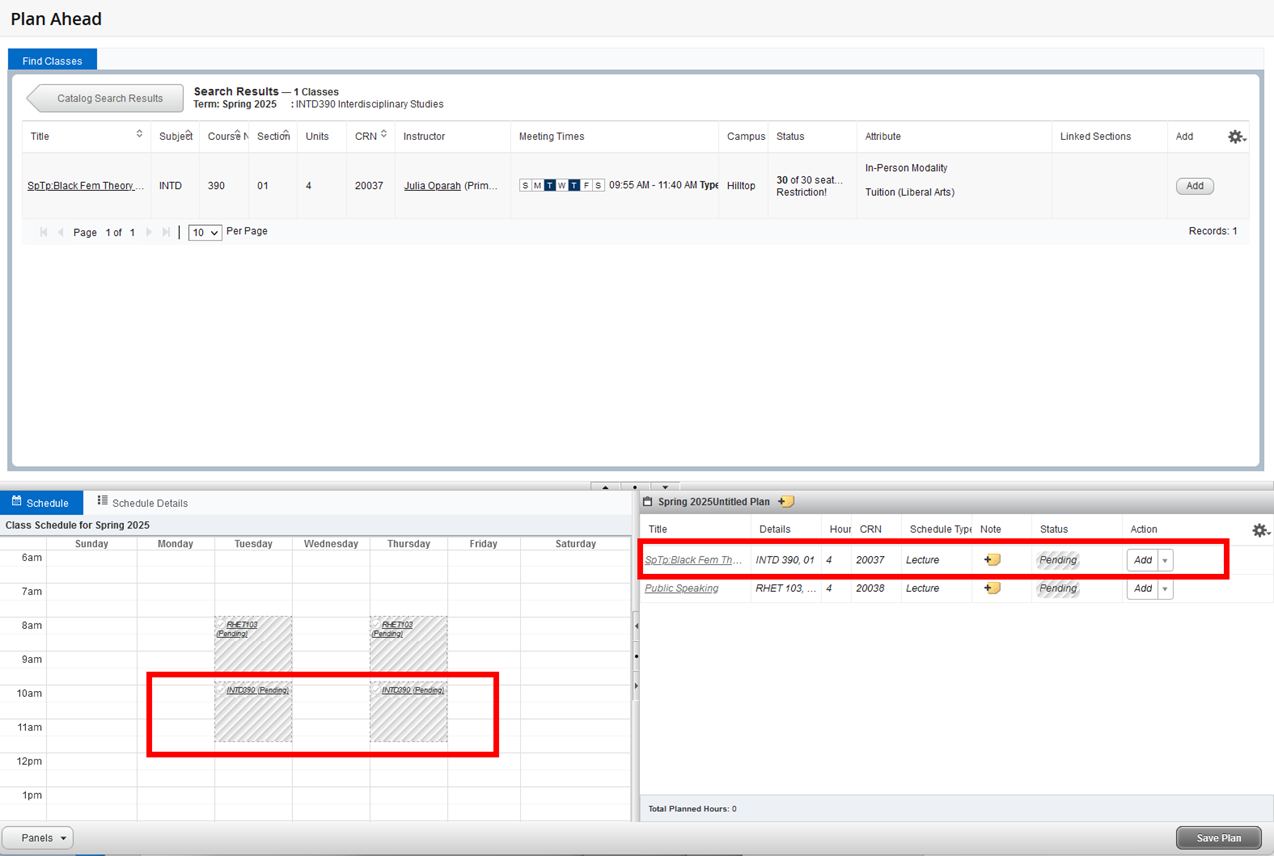
- When finished, click the Save Plan button in the lower right corner.
- Create a name for your registration plan and click the Save button.
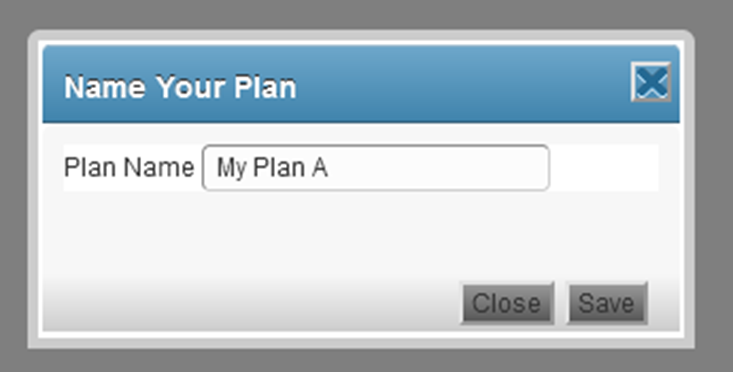
- Your registration plan is created and saved.
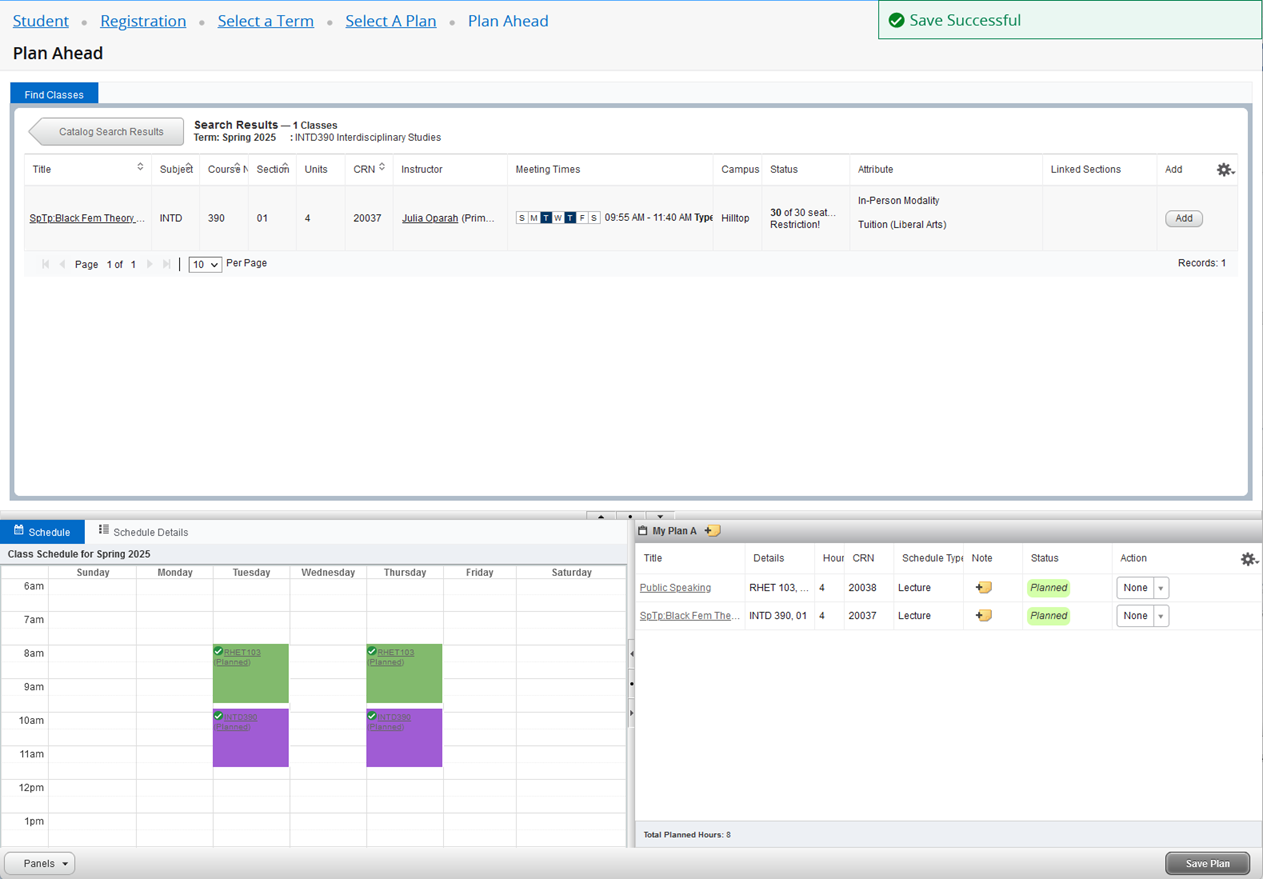
- To create additional plans or to view all your plans, click the Select A Plan link in the breadcrumbs.

- On the Select A Plan page, you can create a new plan. You can also view your saved registration plans and choose to delete or edit a plan.
Note: Creating a registration plan is a tool to assist students with planning to register for classes. Students are not required to create a plan.
Use View Registration Information page to look up and print a class schedule for the current or past terms. To print, click the Printer icon in the upper right corner of the Look Up a Schedule tab.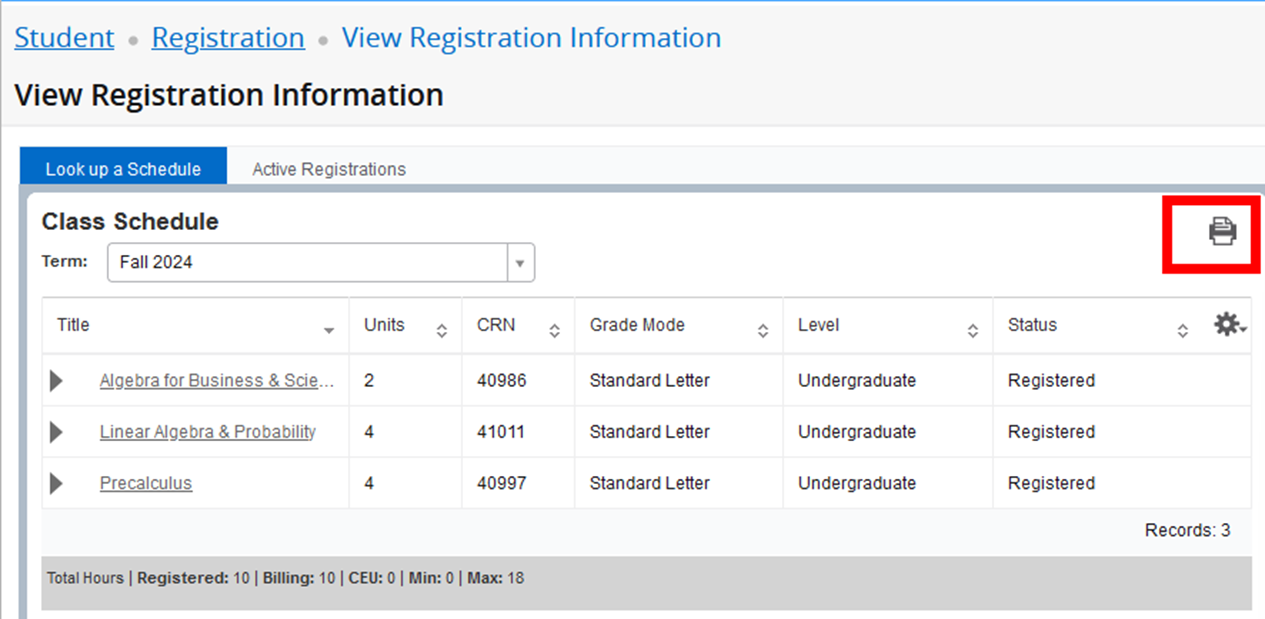
When accessing Banner Self-Service, you may be presented with a notification that you have active action item(s) available. The annual Student Agreement of Financial Responsibility is an action item that all students must acknowledge prior to registering for classes.
- Log into Banner Self-Service (Student).
- If required to complete the Student Agreement of Financial Responsibility, you will see the following notification popup box.

- Click the View Action Item(s) button to go to the Action Item Processing page.
If you click the Dismiss button, you will have the opportunity to acknowledge the Student Agreement of Financial Responsibility in the Banner Self-Service Registration module. On the Registration Landing Page, clicking the Register for Classes link will direct you to the Action Item Processing page to acknowledge the agreement.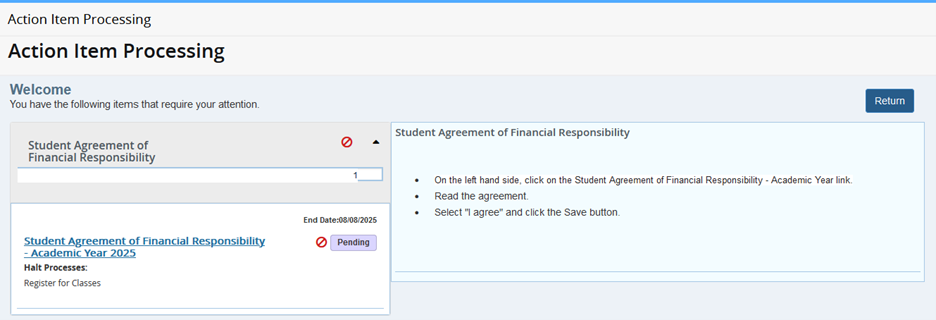
- On the Action Item Processing page, click on the Student Agreement of Financial Responsibility – Academic Year link.
- The agreement will appear on the right side of the page.
- Read the agreement.
- Select “I Agree” and click the Save button.
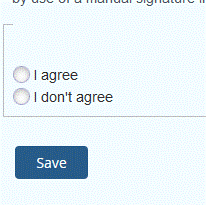
- You have now acknowledged the Student Agreement of Financial Responsibility for the academic year. Click the Continue button to proceed into registration.
Register for Classes
Use the Register for Classes link to add and drop classes.
IMPORTANT NOTE: For the following examples, we use TEST data. The examples DO NOT reflect the actual course section offerings for the Spring 2025 term.
- Click on Register for Classes.

- Select a term and click Continue.
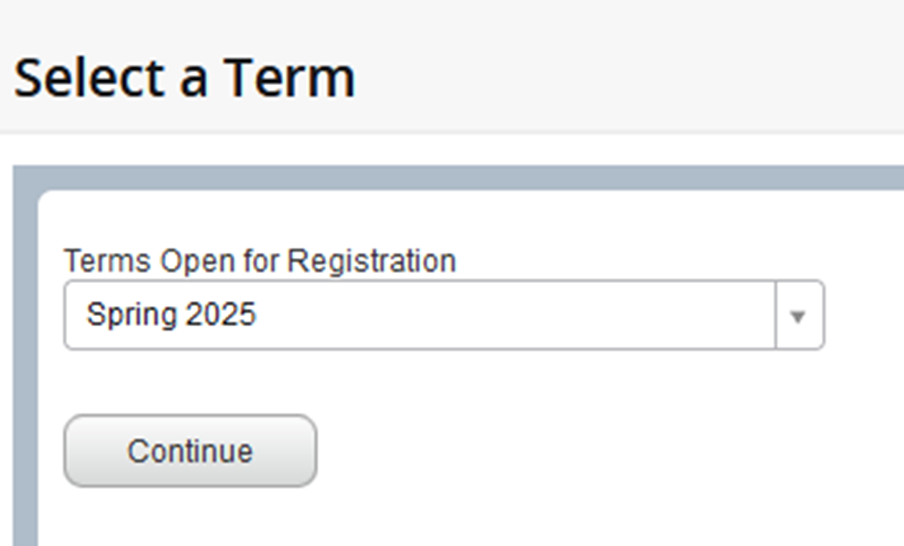
- The Find Classes tab displays basic search criteria of Subject, Course Number, and Keyword. If you need more search criteria, click the Advanced Search link.
Basic Search View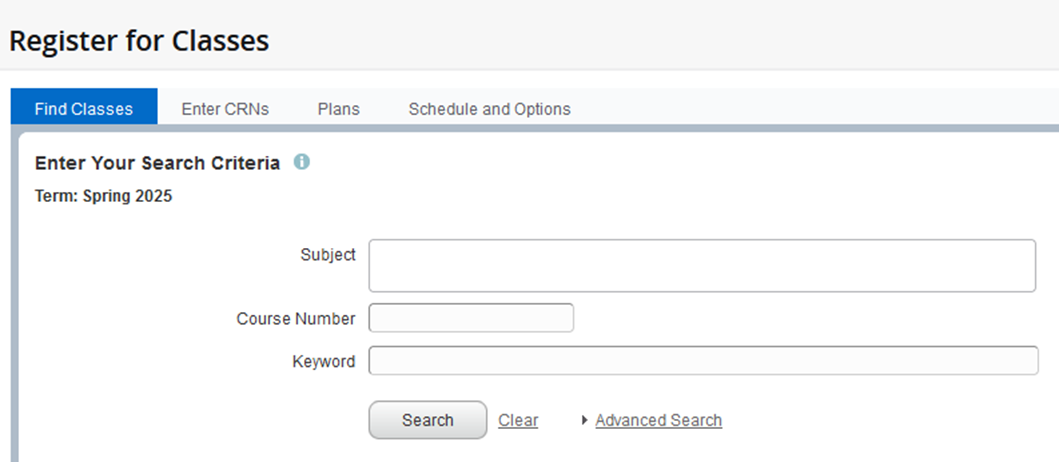
Advanced Search View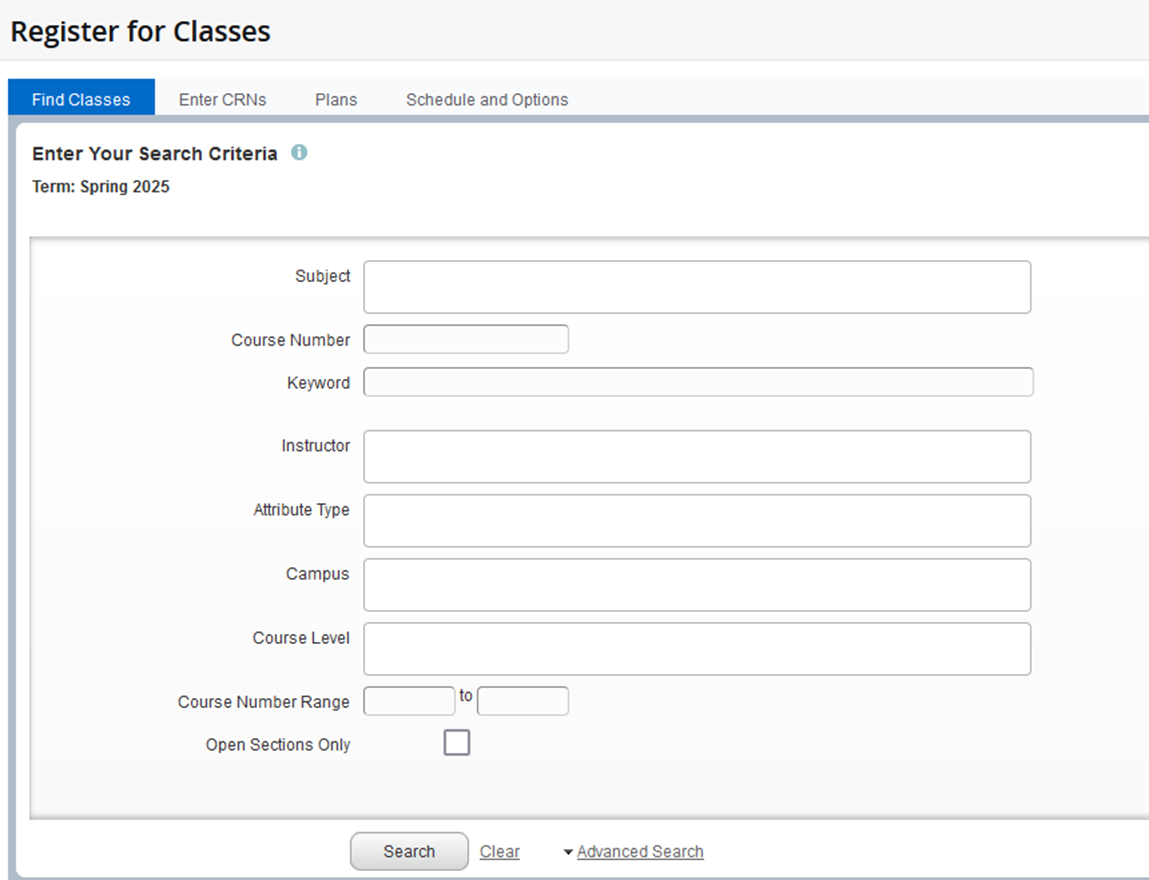
- Enter your search criteria and click the Search button.
- The search results will list classes in ascending order by Subject, Course Number, and Section.
- To change the sort order, use the up and down arrows next to the title in the column heading.
- To see course section details, click the course title in the Title column.
- Click the instructor’s name to view the Faculty Contact Card.
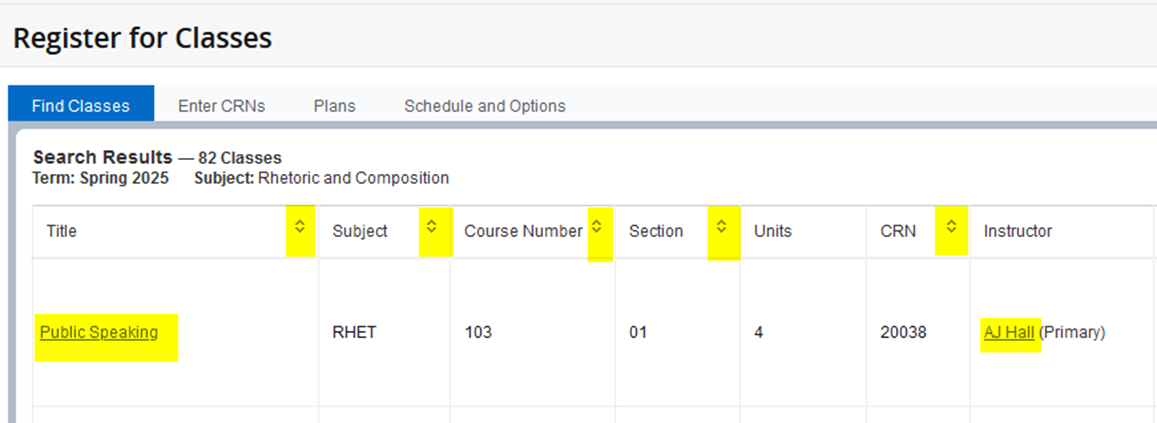
- Use the gear in the right corner of the Search Results view to hide columns.
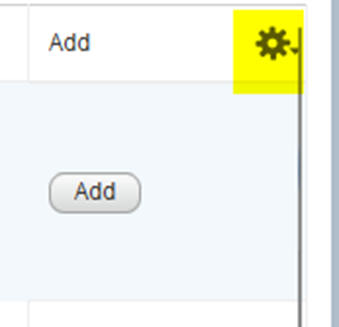
- Add a course section to the schedule by clicking the Add button.
- The course section will be displayed below in the Schedule and Summary panels with a status of Pending.
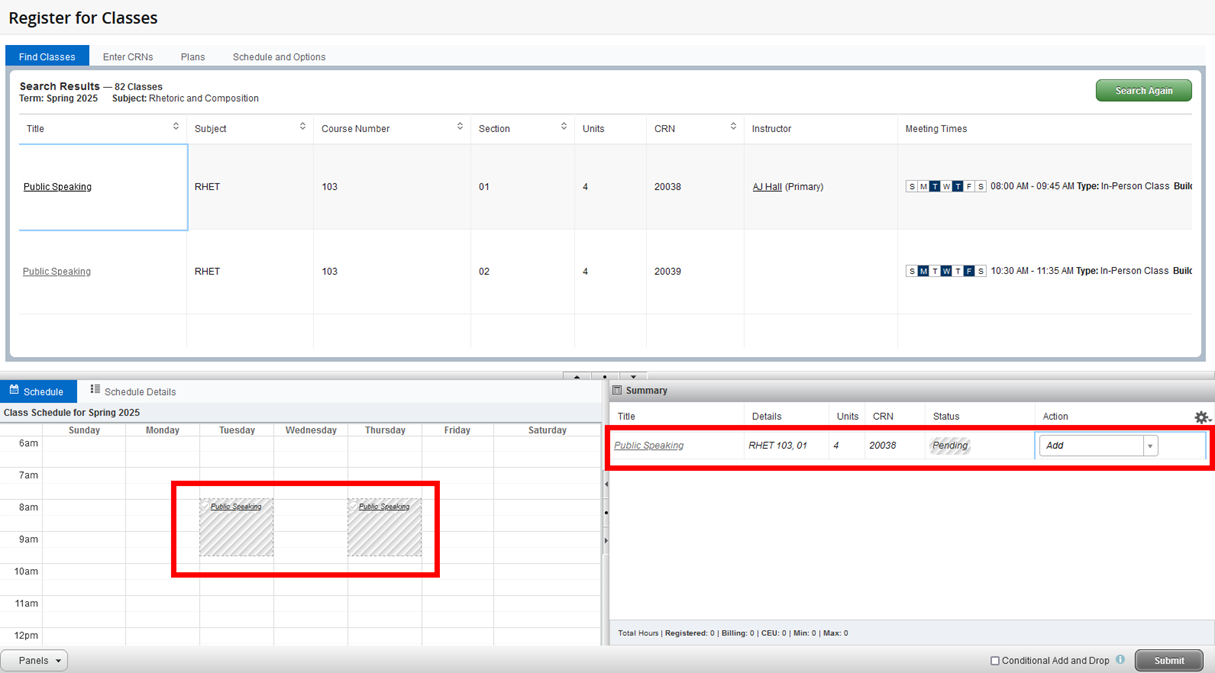
- Click the Search Again button and repeat steps 4-6 to add another course section, if desired.
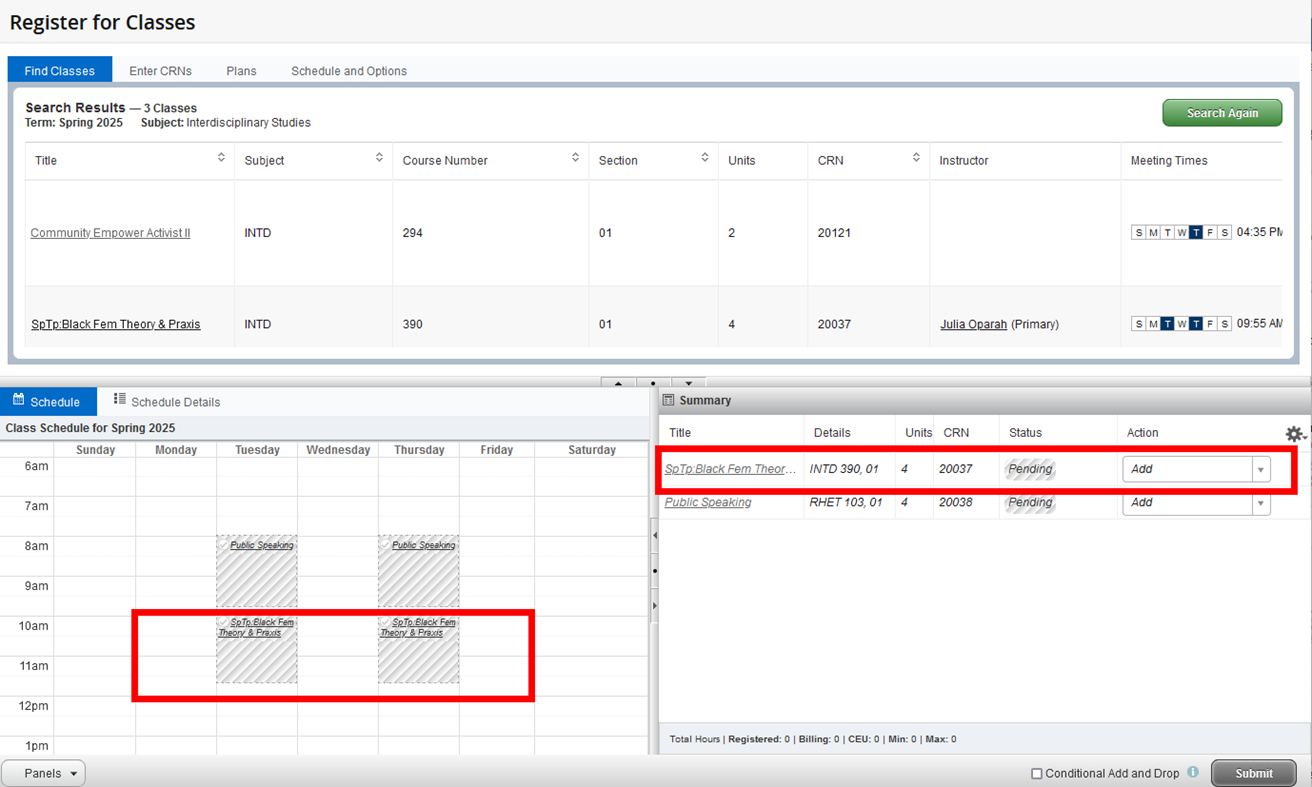
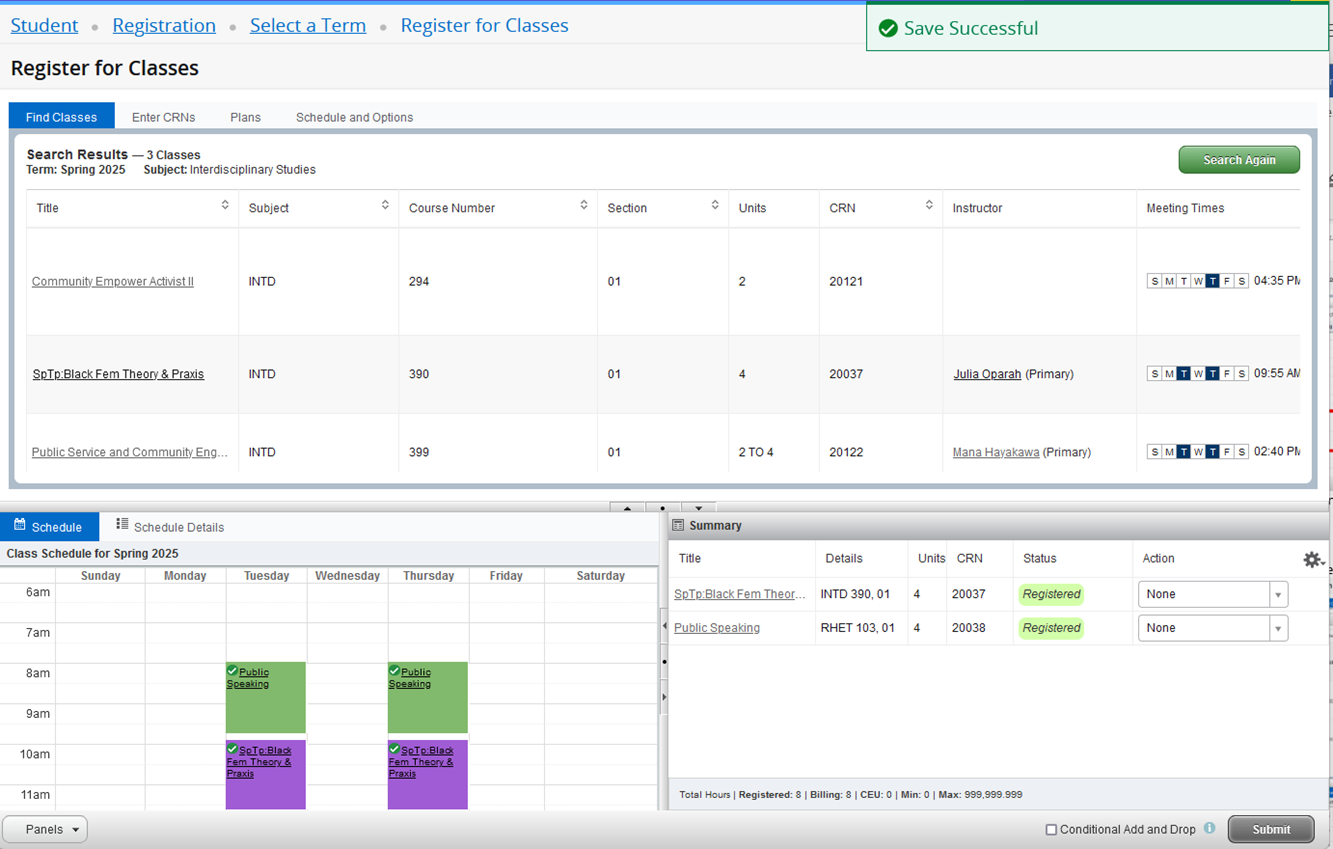
- When finished, click the Submit button in the lower right corner.
- A registration message appears in the upper right corner indicating that the registration was successful or the registration was unsuccessful due to registration errors.
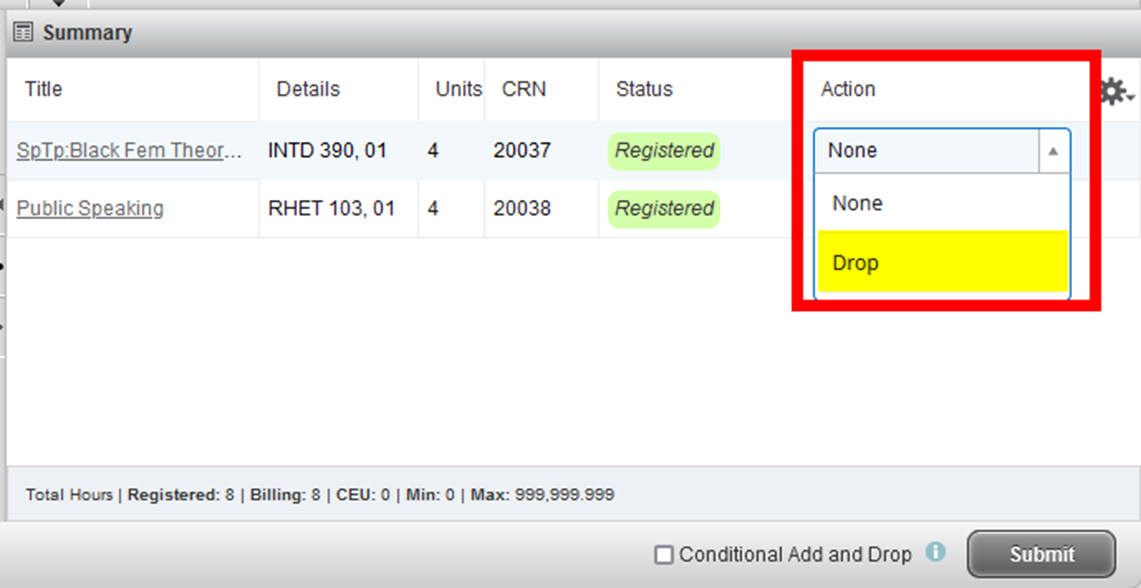
- To drop a course section, click the Action drop-down list and choose Drop.
- Click the Submit button.
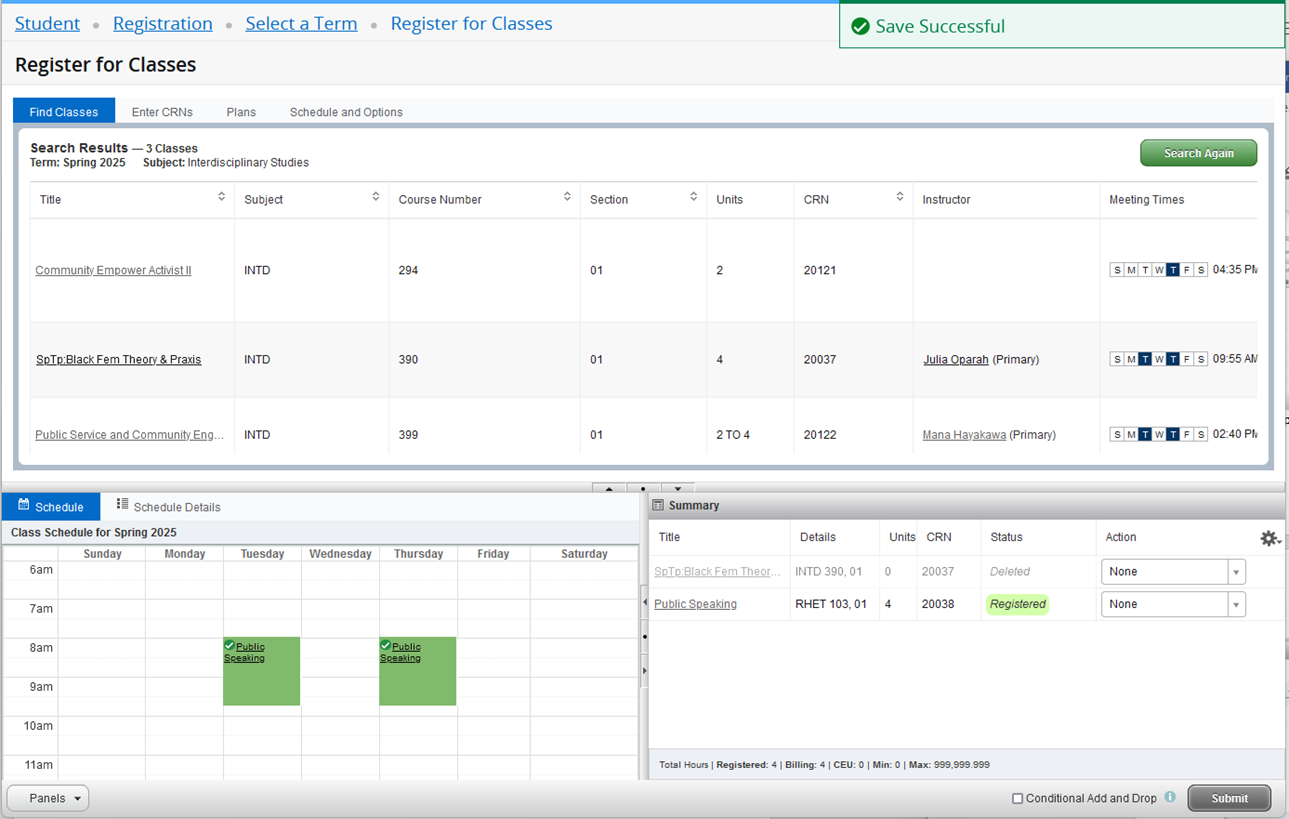
- The course section is now dropped. Click the Submit button again to remove the dropped section from the Summary panel.
Dropping a Class with a Registration Hold
Students who have a hold that prevents registration will not be able to drop classes using the Register for Classes function. Instead, use the Drop Class with Registration Hold page. You may find the Drop Class with Registration Hold page on the Student Services landing page.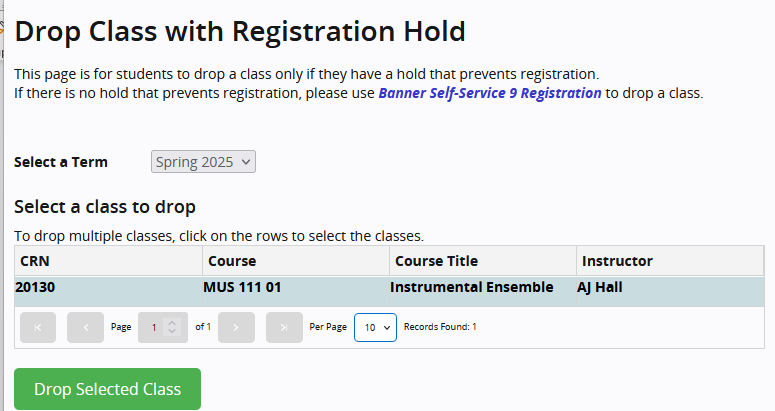
Navigate to the Drop Class with Registration Hold page by performing the following:
- Click on the Banner (four-square) menu icon in the upper left corner.
- Click on Banner → Student → Registration → Drop Class with Registration Hold.
- Select the term. Your registered classes will display.
- Select a class and click the Drop Selected Class button.
Other Options to Register for Classes
Students can also register for classes by CRN or from a registration plan.
Register by CRN
To register for classes by CRN, click on the Enter CRNs tab.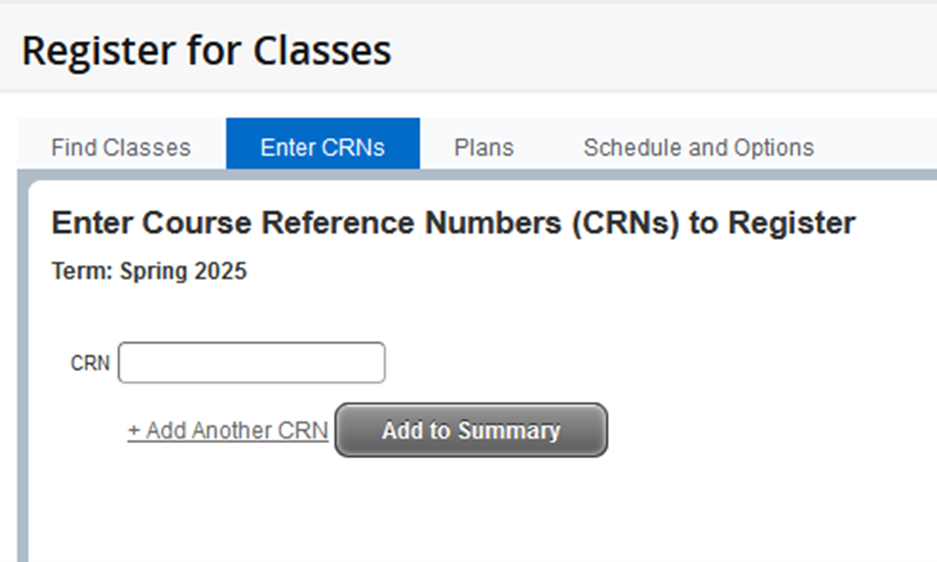
- Enter the CRN and click the Add to Summary button.
- In the Summary panel, click the Submit button to add the course section.
Register from a Registration Plan
To register for classes using a registration plan, click on the Plans tab.
- Your Preferred Plan will appear first. If you have multiple plans, you may need to scroll down to find the plan that you wish to use for registration.
- To add all the sections from a registration plan, click the Add All button.
- In the Summary panel, click the Submit button to add the course sections.
Change Number of Units
Students can change the number of registered units for variable unit courses. To do so, click on the Schedule and Options tab.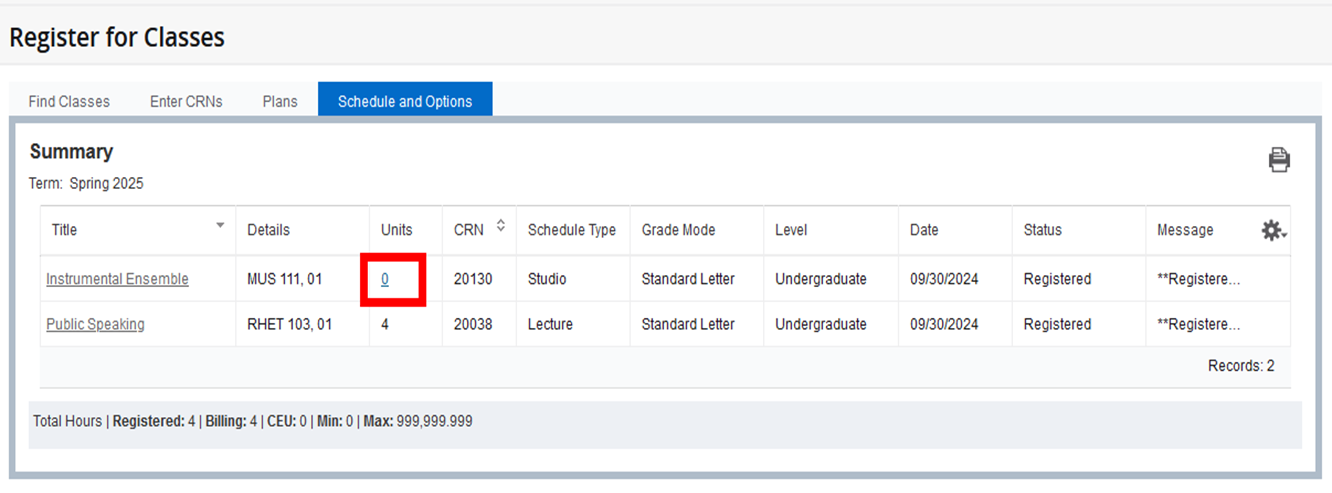
- In the Units column, the number will be hyperlinked if the course section can be taken for variable units.
- Click the number to open an entry box and enter the new number of units.
- Click the Submit button to save the changes.
Conditional Add and Drop
Conditional Add and Drop is a feature for students who need to add and drop classes at the same time. Students can use this feature to drop a class only if the adding of a new class is successful. See below for instructions:
- Use Find Classes or Enter CRNs tab to add a course section to the Summary panel.
- Select Drop for the course section that you wish to drop.
- Check the Conditional Add and Drop box.
- Click the Submit button.
- If there is a registration error for the Add request, then Banner will not perform the Drop request, therefore keeping the student registered in that course section. If there is no registration error for the Add request, then Banner will perform the Drop request.
Example:
Student is registered for RHET 103-01 and wants to switch to RHET 103-03. RHET 103-03 is full and has no available seats.
Add Request: RHET 103-03 Public Speaking which has no available seats
Drop Request: RHET 103-01 Public Speaking
The Conditional Add and Drop box is checked.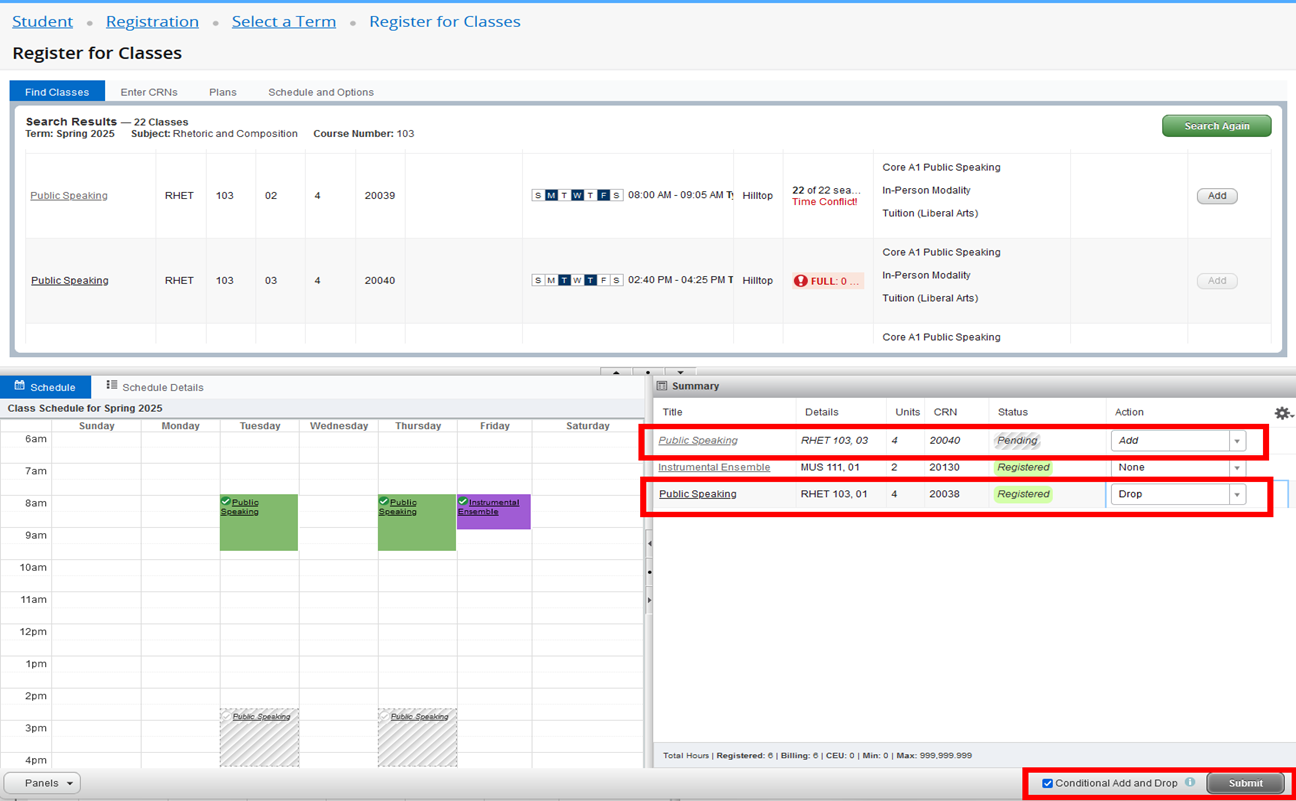
After clicking the Submit button, RHET 103-03 was not added because the course section has no available seats. Since Conditional Add and Drop was checked, RHET 103-01 was not dropped.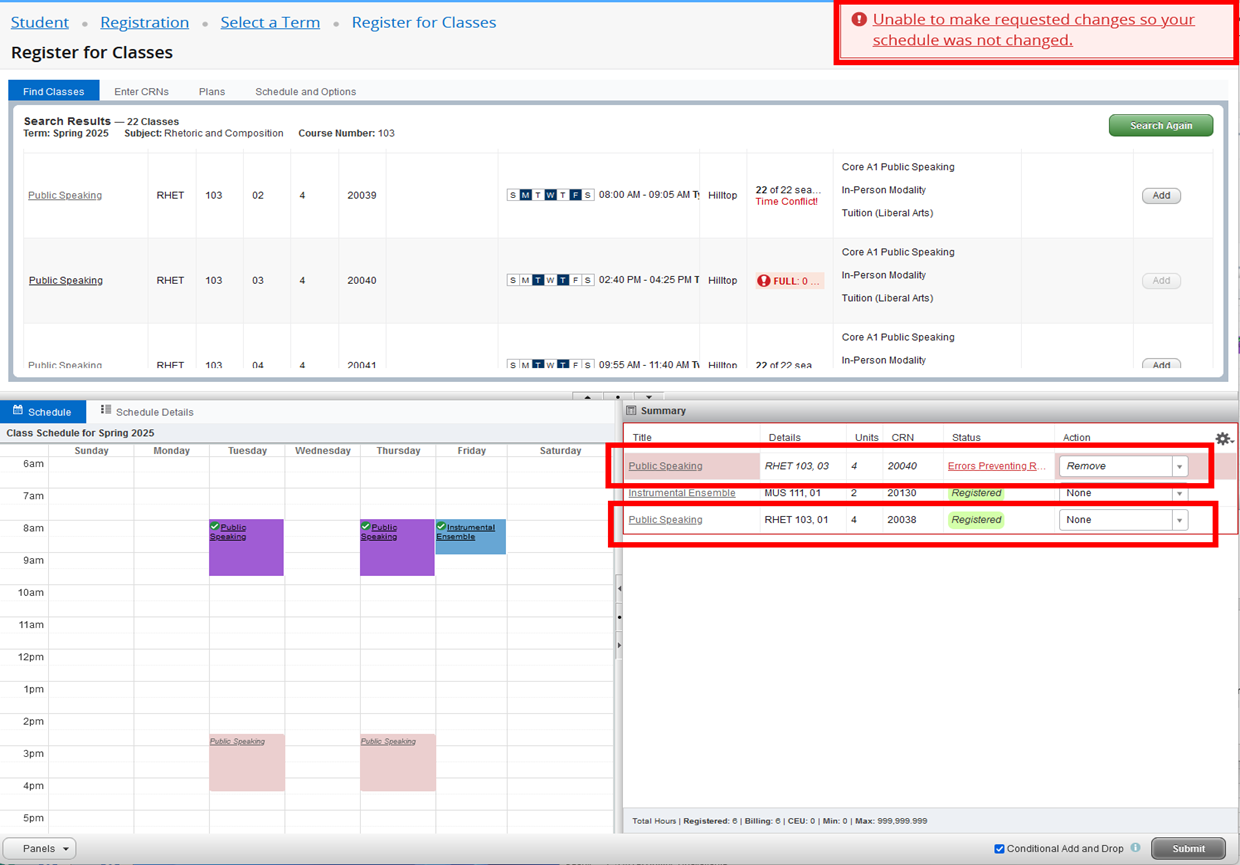
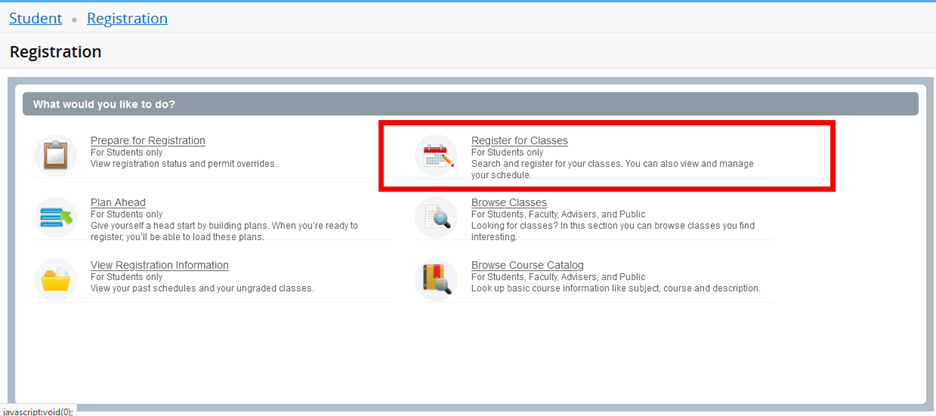
- On the Registration Landing Page, click on Register for Classes.
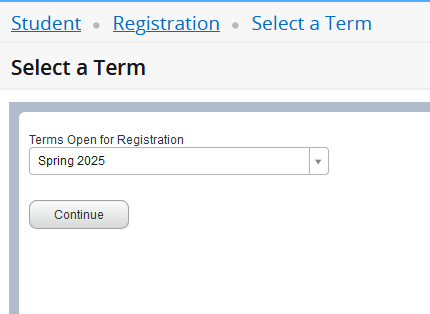
- Select the term and click Continue.
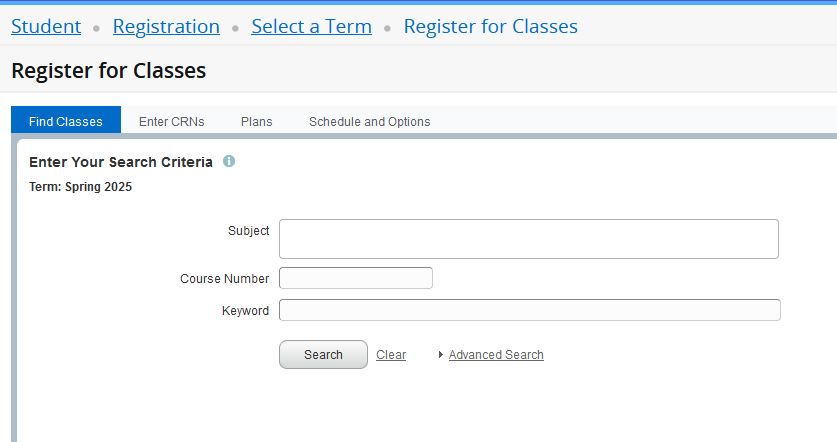
- Perform a class search by entering your search criteria and clicking the Search button. If you need more criteria, click the Advanced Search link.
- Classes that have a waitlist will have waitlist information in the Status column. If the class is full, students may join the waitlist.

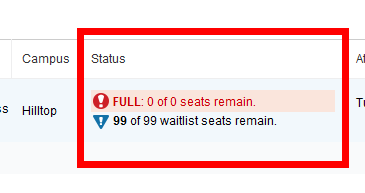
- To join the waitlist, click the Add button.

- The class appears below in the Summary panel with a status of Pending.
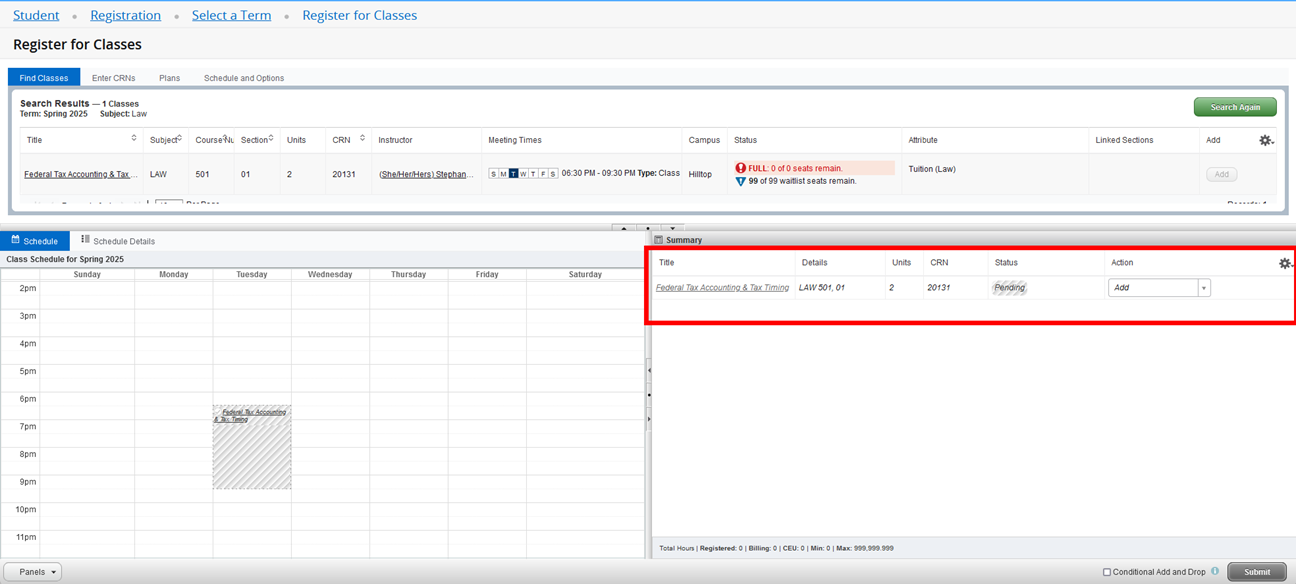
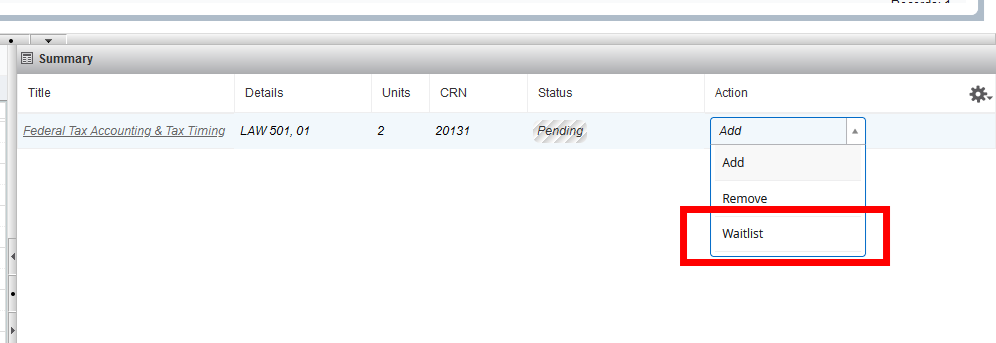
- Click the Action drop-down and select Waitlist. Click the Submit button.
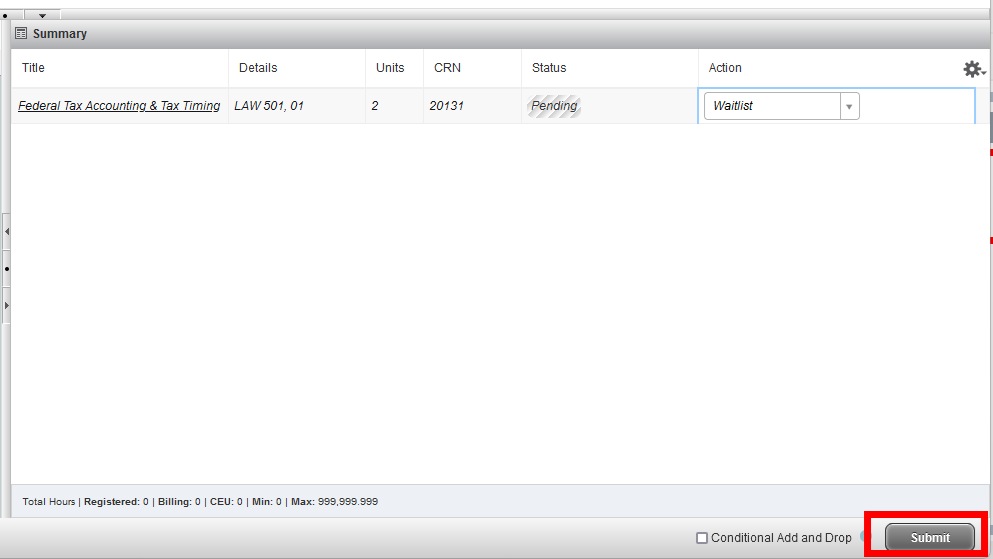
Note: If you do not change the Action to Waitlist and attempt to add the class, you will receive the following error message: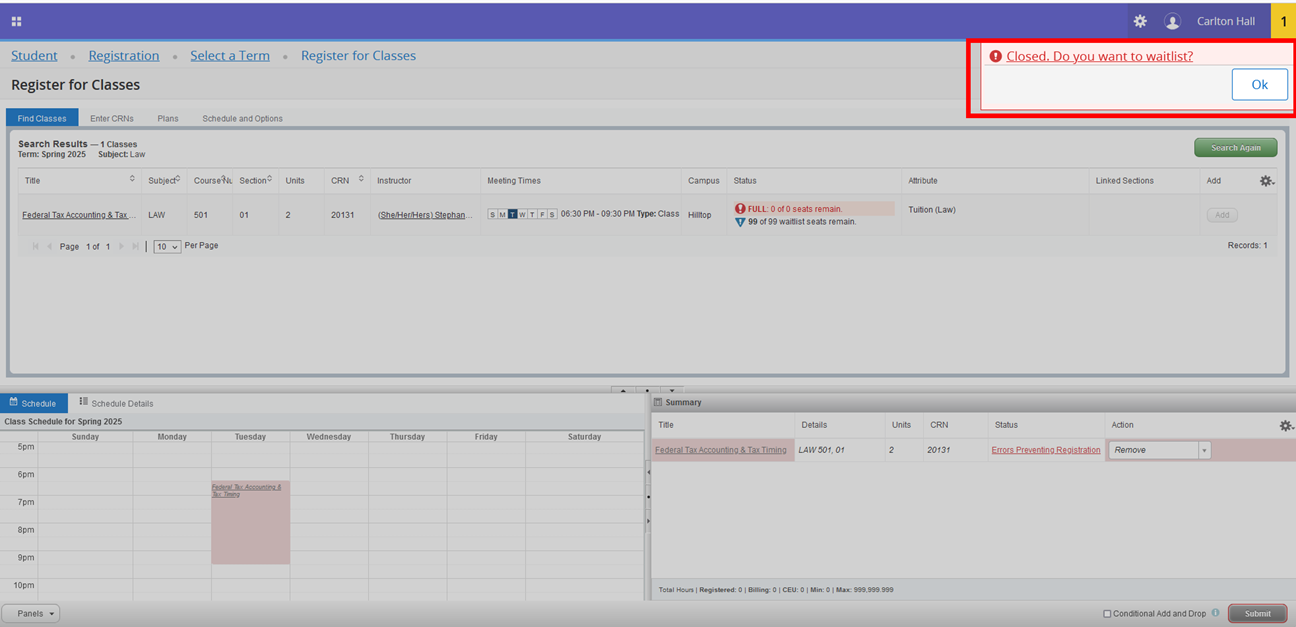
Click the OK button. Go to the Summary panel, click the Action drop-down, select Waitlist, and click the Submit button. - The transaction is processed successfully. The class appears in the Summary panel with a status of Waitlisted.
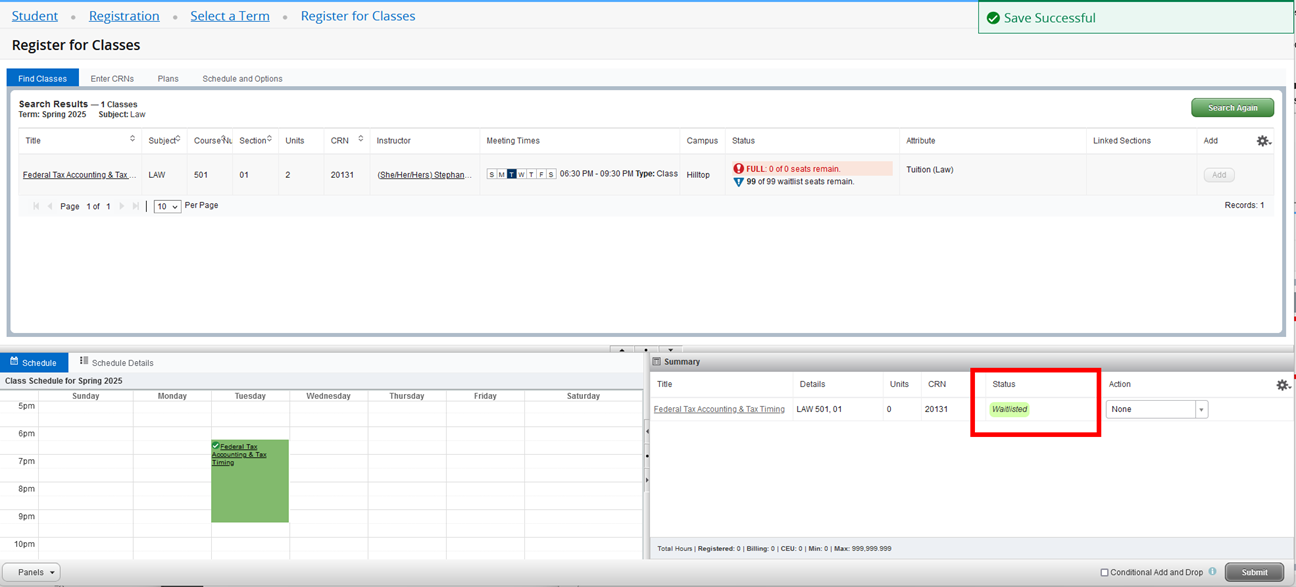
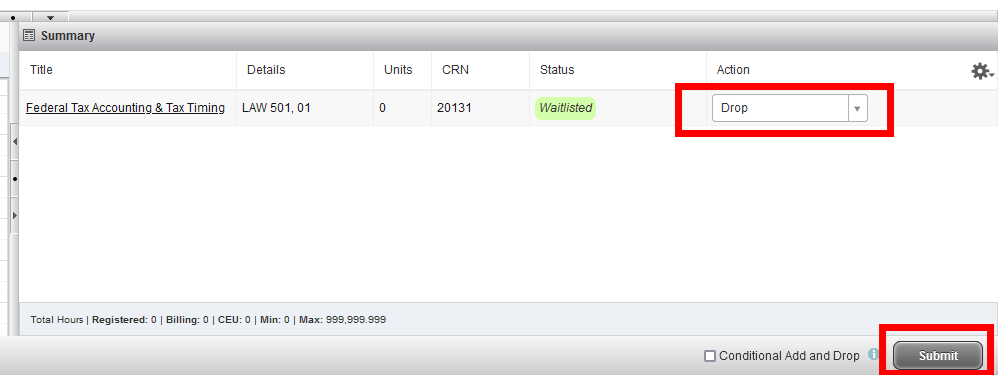
- To leave the waitlist, select Drop in the Action drop-down and click the Submit button.
- The transaction is processed successfully. The status of the class is changed to Deleted.
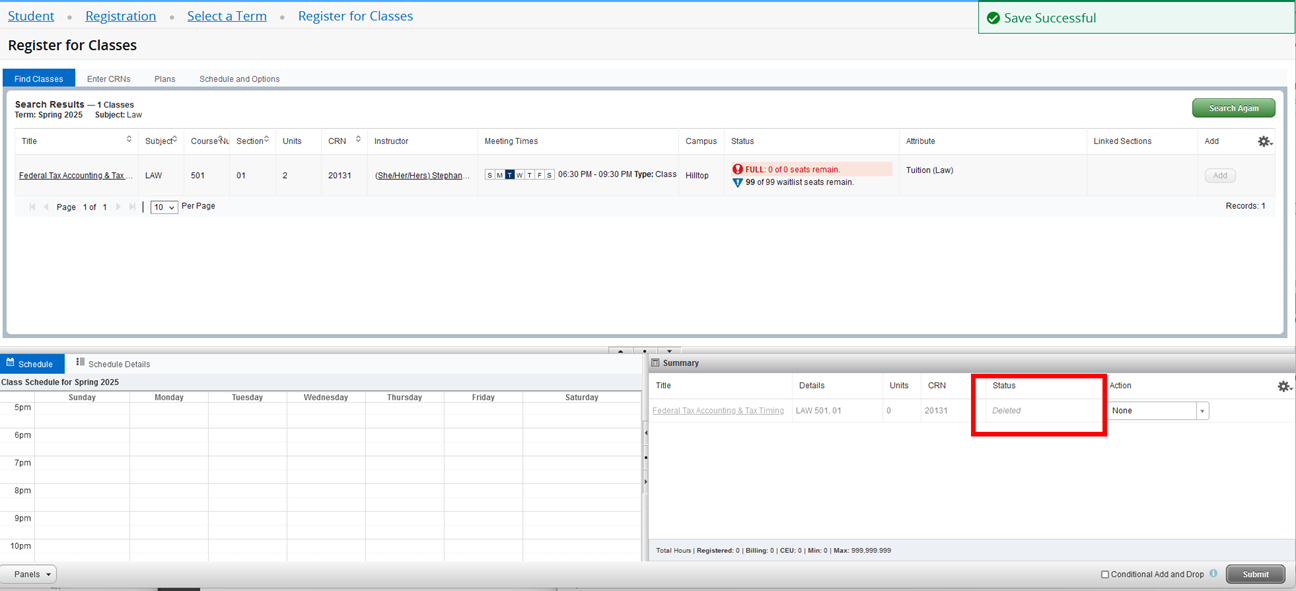
- Click the Submit button again to remove the class from the Summary panel.
Questions about how to waitlist? Please contact the Office of the University Registrar at registrar@usfca.edu. Questions about your waitlist status for a course? Please contact the dean’s office of the academic school or college.
Use the Browse Classes page to search the Schedule of Classes for available course sections.
How to browse for classes in the Schedule of Classes
IMPORTANT NOTE: For the following examples, we use TEST data. The examples DO NOT reflect the actual course section offerings for the Spring 2025 term.
- Click on Browse Classes.

- Select a term and click Continue.
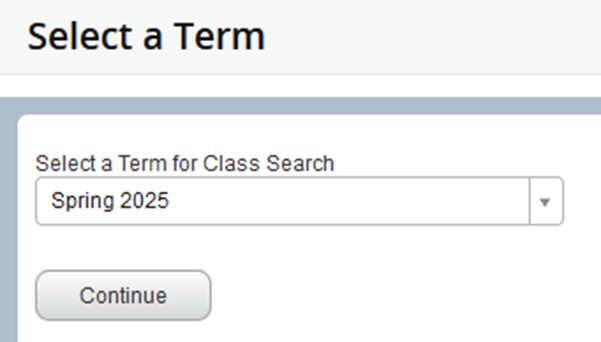
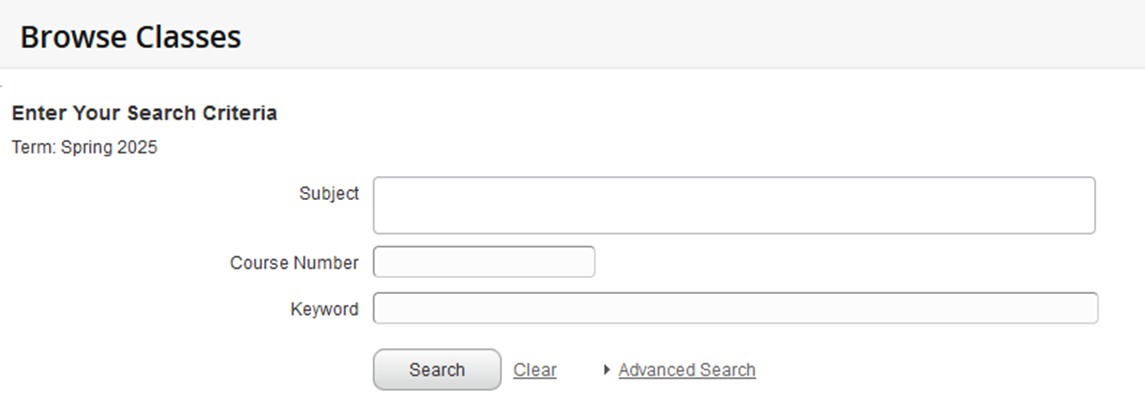
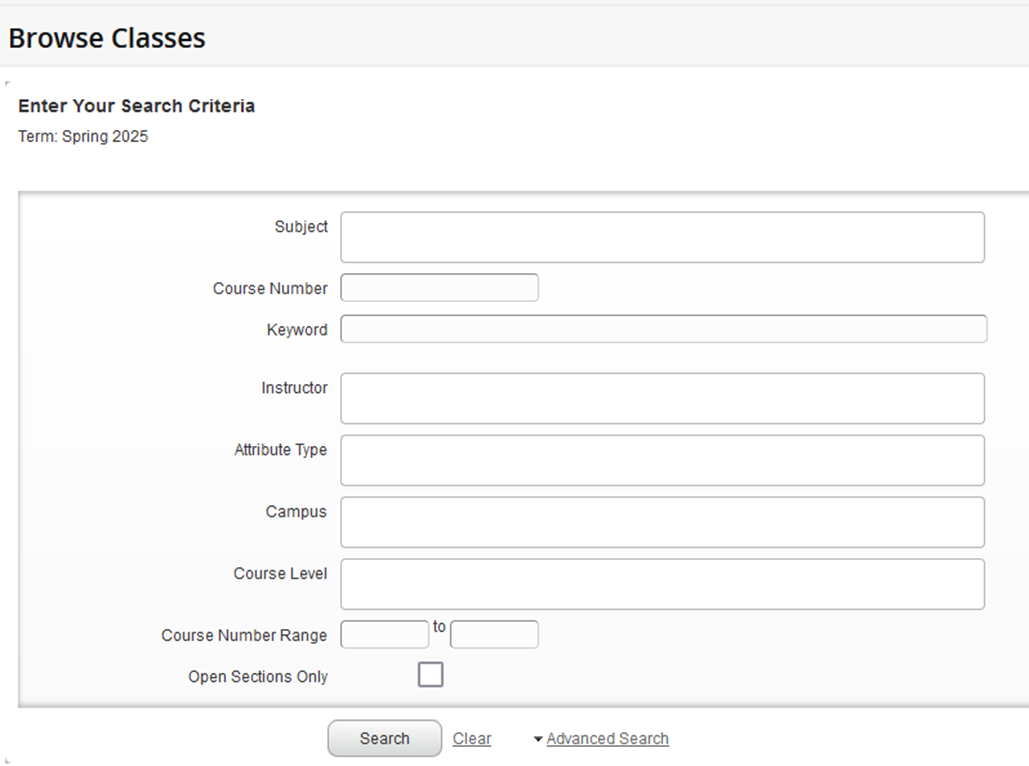
- The Find Classes tab displays basic search criteria of Subject, Course Number, and Keyword. If you need more search criteria, click the Advanced Search link.
Basic Search View
Advanced Search View
- Enter your search criteria and click the Search button.

- The Search Results will produce a list of all active classes for the term.
- The class list will be displayed in ascending order by Subject, Course Number, and Section. To change the sort order, use the up and down arrows next to the title in the column heading.
- Use the gear in the right corner of the Search Results view to hide columns.
- Click the course title to view class details, bookstore links, course description, prerequisites, corequisites, and other information.
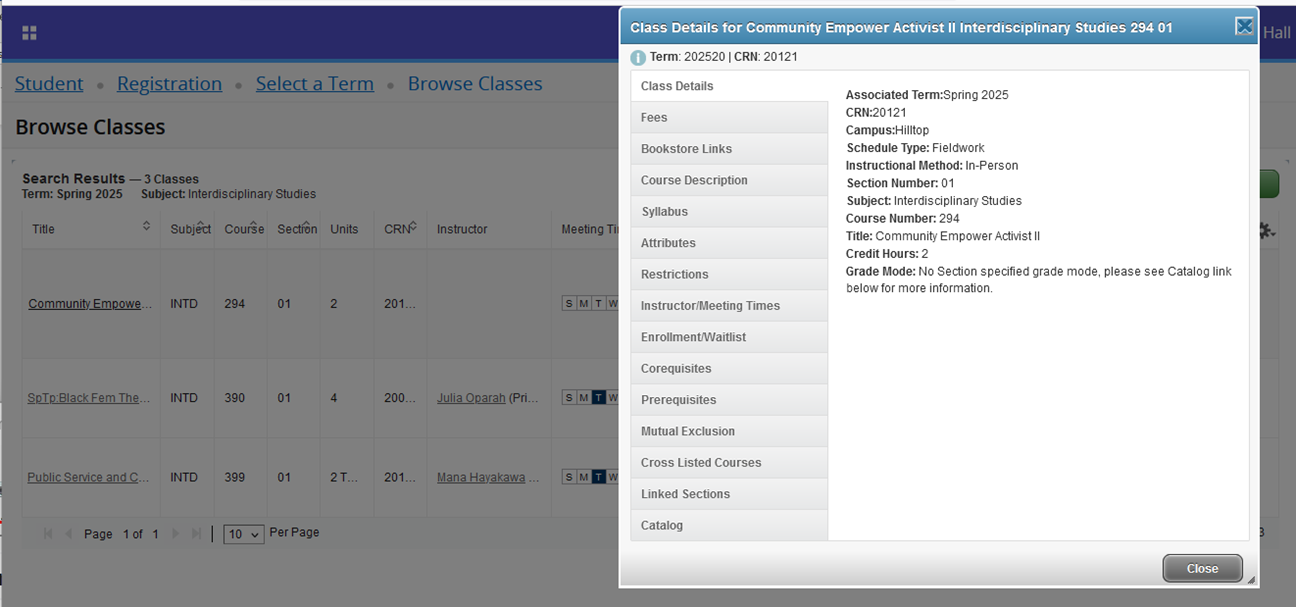
- Click the Search Again button to perform a new search.

Use the Browse Course Catalog to view basic course information such as number of units, course descriptions, prerequisites, and restrictions.
How to browse course catalog
- Click on Browse Course Catalog.

- Select a term and click Continue.
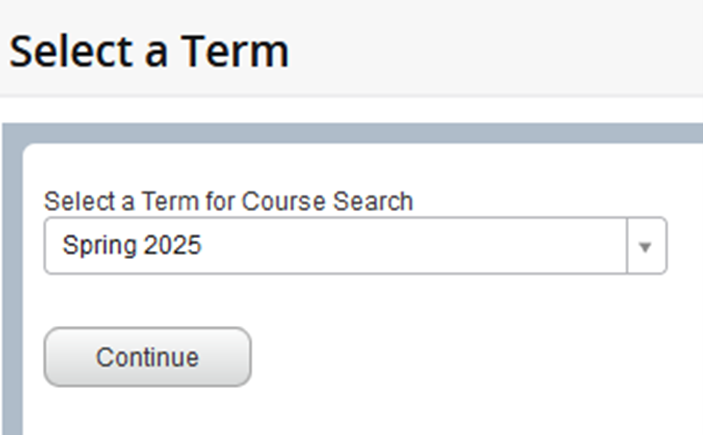
- Displayed will be the basic search criteria of Subject, Course Number, and Keyword. If you need more search criteria, click the Advanced Search link.
Basic Search View
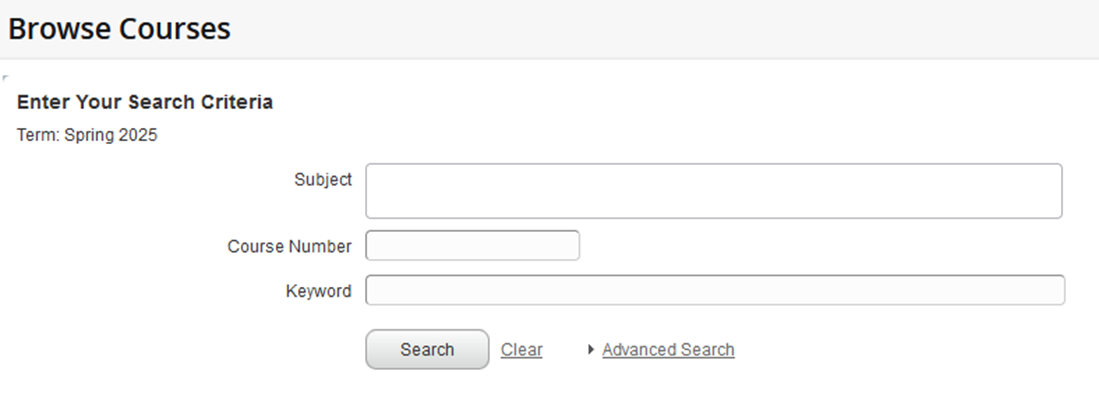
Advanced Search View
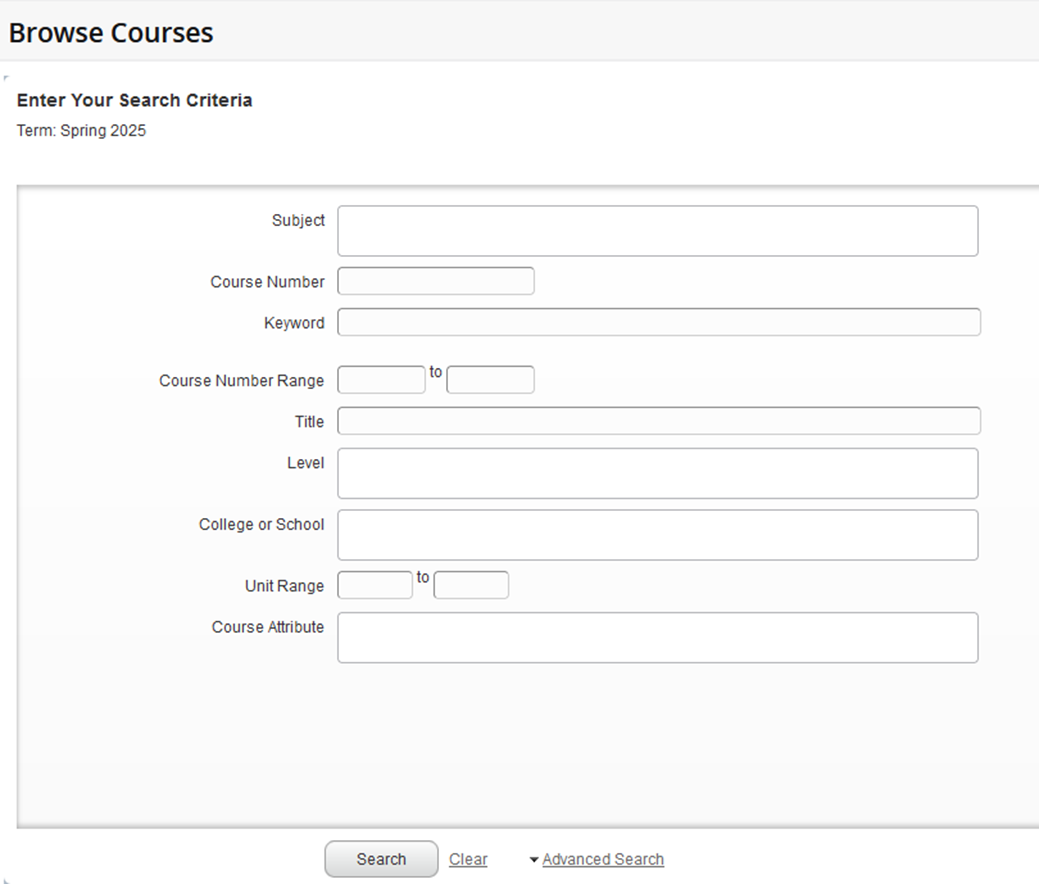
- Enter your search criteria and click the Search button.

- The Search Results will produce a list of all active courses at the catalog level for the term.
- The course list will be displayed in ascending order by Subject and Course Number. To change the sort order, use the up and down arrows next to the title in the column heading.
- Use the gear in the right corner of the Search Results view to hide columns.
- Click the course title to view class details, bookstore links, course description, prerequisites, corequisites, and other information.
- Click the View Sections button to see if course sections are offered for the selected term.
- Click the Search Again button to perform a new search.

For questions regarding Banner Self-Service 9 Registration, please contact the Office of the University Registrar at registrar@usfca.edu or (415) 422-7260.
SSB 9 Registration Video Tutorials
SSB 9 Prepare for Registration and Registration Access Times