MyISSS Student Handbook
Welcome to your MyISSS Student Portal. This portal allows students to submit requests to ISSS and view information and announcements from our office. You can also use this page to view the status of your current requests and view all past requests submitted through your MyISSS Student Portal. It is also the system which ISSS uses to submit the federally required data to SEVIS (the DHS Student and Exchange Visitor Information System). Below you will find information on how to login, submit a request, and other frequently asked questions. Note that students must have access to myUSF and their USF email address in order to access MyISSS.
To login to your MyISSS Student Account, you can click the link here: MyISSS. Once you are in the Student Portal this is the view you should see. You can then choose the login type which best describes your student status. For most students and alumni**, you will want to choose the first box “MyUSF Credentials Login.” You will be able to log in using your existing MyUSF username and password.

For alumni on OPT and STEM OPT whose MyUSF login credentials are no longer active, you will need to contact the ISSS office to gain access to the MyISSS portal.
**For alumni on OPT and STEM OPT who have graduated in Summer 2023 or BEFORE can log into MyISSS using the USF Alumni Login (center box in image above) and your Portal account login.
Once you are successfully logged in, you will be able to see your MyISSS Profile home screen. You will see something similar to the image below:
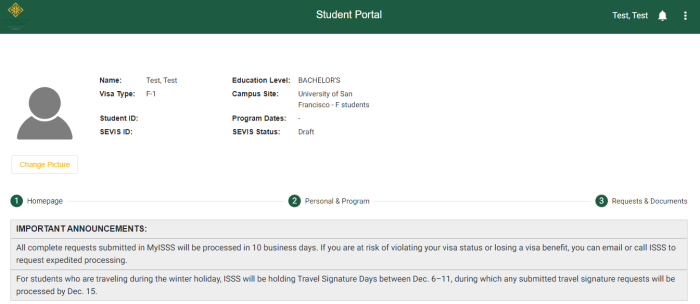
The ① Homepage will have important announcements and will provide links to the ISSS website for common topics.
Under ② Personal & Program, you can review your personal information, such as name and date of birth, and your degree program information.
In ③ Requests & Documents, you can submit requests, review the status of requests you have made to ISSS, like F-1 CPT or Travel Signature, and download documents issued to you by ISSS.
-
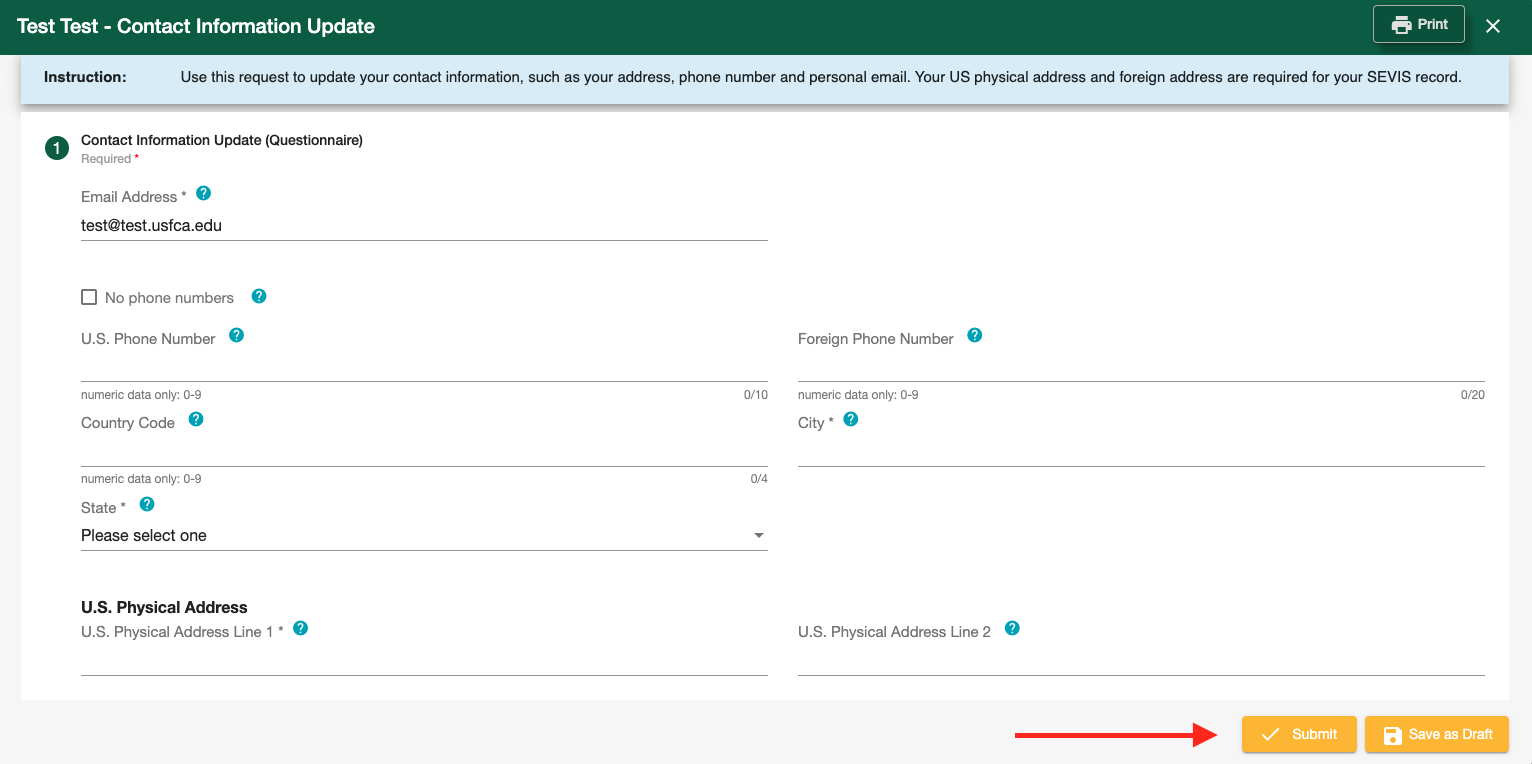
To report a new U.S. physical address, foreign address, and U.S. phone number to the U.S. government, log into MyISSS and click Requests & Documents. Scroll down and click on the ID Card icon for the Contact Information Update request.
-
Review and update your contact information.
-
When you are finished, click the Submit button at the bottom right of the page.
-
Allow up to 10 business days for the ISSS office to update your information on your MyISSS profile and in SEVIS.
-
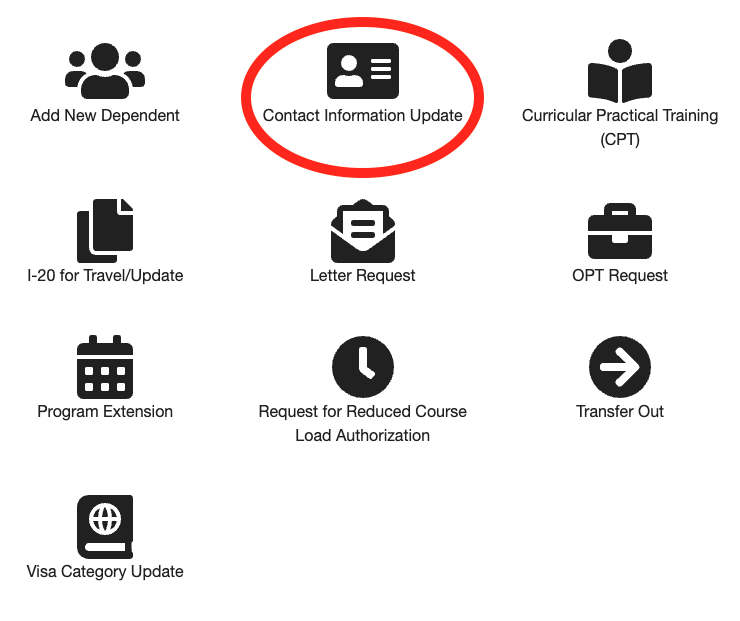
First, log into your MyISSS portal and click ③ Requests & Documents. Your page should look similar to the image above.
-
To submit a new request, select the appropriate icon on the right side of the page. Once you select the icon, a pop-up window will appear for you to complete and submit your request. If you do not see the request icon, you do not meet the eligibility to submit that request. You can review detailed request information on our ISSS website.
-
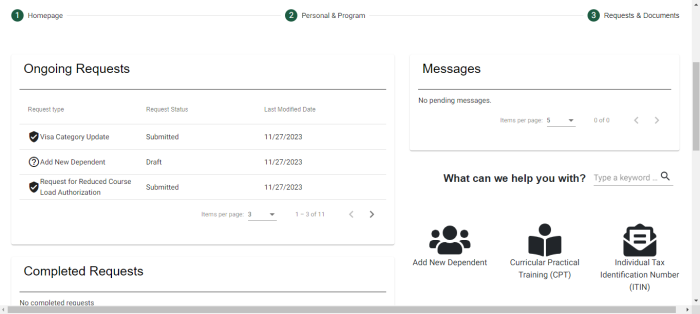
To review a request that you have started and saved (Draft) and to submit it to ISSS for processing, you can find it under the Ongoing Requests section. In this section, you can also find and review the status of requests you have already submitted.
-
You can find requests that have been reviewed and/or processed by ISSS in the Completed Requests section.
-
If a new I-20 or letter has been issued, you can find and download them from the Documents section of this page.. Look over your I-20 and letters to make sure there are no mistakes. After downloading and printing your I-20 in color, make sure to sign your I-20 by hand in black ink on the Student Attestation line.
-
If you have any off-campus work authorizations (such as CPT or OPT), you can view the authorization information, including employer information, in the Practical Training section. This section is VIEW only; to make changes to your work authorization period and update your I-20 or DS-2019, review the ISSS International Student Employment webpage for instructions specific to your work authorization.
-
Requests more than 30 days old that have no recent action will be deleted or dismissed. Deleted requests cannot be recovered and students will need to start a new request. Dismissed requests can be retrieved if necessary; contact ISSS for assistance.
For requests that require an advisor’s input and signature, students will need to send an electronic recommendation to their advisor. First you will need to determine who the appropriate recommender is for you. Your recommender will typically be your department chair or academic advisor.
In the Approval section of your request, enter your advisor’s name in the Approver Name line and enter their USF email address in the Approver Email line. You can now click the SUBMIT button - this will email your advisor the online link to complete your recommendation.
Requests cannot be reviewed by ISSS until the recommendation has been completed by your advisor. Once the recommendation is completed by your advisor, the status of your request will be updated and the request can be reviewed by ISSS for processing. The 10 business days processing time starts from when the request can be reviewed by ISSS.
Once you have started a request in MyISSS, there are several statuses that can apply to your request. Review the request status list below to understand where your request is in processing.
- Draft: This request has been saved to complete at a later time and has NOT been submitted to ISSS for processing
- Approver Review: The request has been submitted by the student and is awaiting a response from the student’s academic advisor/department chair for the Approver Form (online recommendation)
- In Review: The request has been reviewed by ISSS and is awaiting final review. No further action is required by the student
- Submitted: The request has been submitted by the student and is waiting to be reviewed by ISSS
- Clarification Requested: This request has been sent back to the student for further information
- Approved: ISSS has approved the request and are awaiting documentation from SEVIS
- Completed: Processing of the request has been completed. If documentation is issued, such as an I-20 for OPT or Travel, it can be found in the Documents section of your MyISSS
- Dismissed: The request has been denied or is more than 30 days old and have been archived. Students can review the notes in the request for the denial reason.