Tips & Advice
1/13/2021
for A+A faculty and staff
Did you know you can run a report 30 minutes after your Zoom meeting ends to see a list of everyone who attended and their total, cumulative attendance time? The IT department at Cal State Fullerton has published some nice instructions.
Note that step one of their instructions will be different for USF. Instead, you should visit the USF Zoom webpage and then click “SIGN IN” near the top of the page.
10/9/2020
for A+A faculty and staff
Zoom has introduced a "beta" feature that might wake up your students the next time you present a slideshow during class.
In short, you can now use your PowerPoint or Keynote slideshow as a virtual background, sort of like your local TV weather person does. You can even define your own video’s size and position. (By default Zoom shrinks you into the lower, right corner of the screen as depicted in the screenshot below; that’s a Keynote slide behind me.)
You can read all about this feature on Zoom’s official support page.
Before you try it, here are four caveats that caught my attention:
- Your Zoom software must be up to date. If you’re not sure, follow Zoom’s update instructions.
- Your computer must meet the minimum requirements for using virtual backgrounds.
- Sound, transitions, or animations embedded in your PowerPoint or Keynote slideshow are not supported.
- This is a “beta” feature, which essentially means that it’s still in the testing phase, but the reaction on your students’ faces might be worth a small amount of risk. So have fun, but be prepared to fall back on sharing your screen in the usual way.

9/8/2020
for A+A faculty, staff, and students
You may have seen in the news that a handful of Microsoft online services were offline for a while yesterday. What you may not know is that USF’s “single sign on” or “SSO” system is dependent on one of those Microsoft systems, and consequently, for a couple of hours yesterday (roughly 3pm-5pm), no one could sign into any USF systems that authenticate via SSO — which is practically all of them, including Zoom. (If you were already signed in, you weren’t affected.)
Did you know ITS maintains a “system status” webpage where it notes service interruptions, often before sending a formal e-mail to the USF community? For example, yesterday’s outage was noted on the system status webpage roughly 1.25 hours before we received an e-mail.
So in order to give yourself as much time as possible to pivot and prepare in the event of a USF/ITS service outage, consider bookmarking this page, and while you’re at it, click the “Subscribe to Updates” button at the top of it:
9/8/2020
for A+A faculty and staff
Sharing content with audio? Check the “Share computer sound” box before sharing your screen.
When sharing your screen to present content that includes audio, e.g. YouTube videos or PowerPoint/Keynote presentations that include audio, there's a particularly important setting to know about.
Here’s Zoom’s official help page on the subject.
In brief: When you click “Share Screen”, look closely at the bottom of the options window. There’s a check box to “Share computer sound.” You must check this box if you want your attendees to hear any sounds that are not passing through your microphone.
Note: The first time you select this option, you’ll be prompted to install a “Zoom audio device.” This is normal, and only has to be done once.
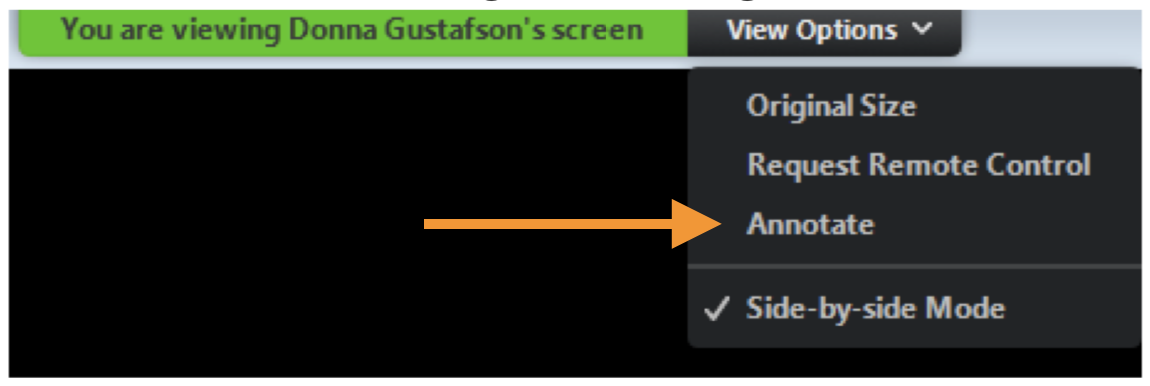
Both you and your attendees can annotate your shared screen or whiteboard.
Once you’ve started sharing your screen (or a whiteboard) with your attendees, both you and your attendees can make annotations for all to see.
As the host, you’ll see a large “Annotate” button, but attendees must click "View Options” in the small, "you are viewing" banner and then select “Annotate":
Scroll down to the section titled “Using annotation tools” on Zoom's official help page to learn more. In brief, the screen annotation tools available to attendees are:
- Text
- Draw (lines, arrows, and shapes)
- Stamp (predefined icons)
- Eraser
In addition, hosts also have these tools:
- Select (and move)
- Spotlight (and call-out arrow)
- Save
8/27/2020
for A+A faculty and staff
Q: How can I send an encrypted e-mail message at USF?
A: You can use “Proofpoint Encryption” to send a secure, encrypted e-mail at USF. Here’s the ITS knowledge base article on the subject.
Q: How can I set up pre-defined, student-bookable, Zoom-linked appointment slots in my Google Calendar for advising, office hours, critiques, etc.?
A: Expand the topic on this very webpage titled "How to use Zoom with appointment slots in Google Calendar” to learn how.
Q: How can I save a chat transcript from my Zoom meeting?
A: You have three options:
Option 1: To manually save your in-meeting chat, see the instructions under the heading “Saving chat manually” on this help page.
Option 2: To always auto-save your in-meeting chats, you’ll need to change your USF Zoom account settings:
- Visit the USF Zoom webpage: https://usfca.zoom.us
- Near the top of the page, click “SIGN IN”.
- On the left side of the page, click “Settings”.
- Scroll down the page to the group of settings titled “In Meeting (Basic)”
- Enable the option, “Auto saving chats”.
After using either of the previous options, to locate the saved chat transcript on your computer, see the instructions under the heading "Default chat save location on computer” on this help page.
Option 3: If you recorded your meeting to the cloud, by default, the chat should have also been saved as a .txt file in the same location as the video of the meeting. See the instructions under the heading "Accessing your saved in-meeting chats on the cloud” on this help page.
Q: Can you recommend any free Mac apps for highlighting, “calling out”, or emphasizing a portion of my screen while sharing my screen with my students in a Zoom meeting?
A: Take a look at ScreenBrush in the Mac App Store. The free version includes a couple of useful features, including the ability to drawn on your screen (over any app) and a “flashlight” effect to call attention to portions of your screen. The paid version ($4) adds features like shapes, arrows, and text boxes.
Q: Are there any free, web-based, real-time, collaborative “pin-up board” or “whiteboard" tools that I might be able to use with my students?
A: Here are a few that have come to my attention:
- ConceptBoard - They offer free and paid accounts. Learn about the (fairly generous) limits of a free account here.
- Mural - They offer free accounts to educators and students. See their education page, which states, "If you are a teacher or student you are eligible for a free education workspace. This workspace includes 10 members, 25 registered guests, unlimited visitors and is renewed annually."
- Google Jamboard - In short, a Google Jamboard is a virtual, web-based whiteboard that you can share with others in the same way you’d share any other G Suite resource, like a Google Doc, Google Sheet, or Google Form. It's included in your USF Google account. You can give users editor or viewer access, and once you share your Jamboard with others, you and your collaborators can edit and view it in real time.
Q: When sharing G Suite resources with my students, is it normal to see a message that students are “outside of my organization”?
A: Yes. Students' USF Google accounts are in a separate “organization” from USF faculty and staff who are in the organization titled “Faculty & Staff DonsApps.” But you can still share G Suite resources with them, just click “Share anyway” when prompted.
8/6/2020
for A+A faculty and staff
Wouldn’t it be nice if you could direct students to a webpage where they could instantly book pre-defined appointment slots on your Google Calendar for office hours, advising, or critiques? On top of that, wouldn’t it be nice if you could include a Zoom link in each appointment slot?
You can do both. Here's how:
Step 1: Copy your Zoom “Personal Link"
Your "Personal Link" is a static, perpetual link to your “Personal Meeting Room.” Think of it as your virtual office. Everyone at USF has one. Here’s how to find your link:
- Visit the USF Zoom webpage: https://usfca.zoom.us
- Near the top of the page, click “SIGN IN”.
- On the left side of the page, click “Profile”.
- Look for your “Personal Link” (about the third row down). Tip: You can customize your personal link if you’d like. Click “Customize” to the right of your link, edit it, and click “Save Changes”.
- Click “Show” next to your redacted personal link to view the full link, select the entire link, and copy it to your clipboard.
Step 2: Customize the settings for your “Personal MEETING Room”
- Visit the USF Zoom webpage: https://usfca.zoom.us
- Near the top of the page, click “SIGN IN”.
- On the left side of the page, click “Meetings”.
- In the row of choices near the top of the page, click “Personal Room".
- Near the bottom, right corner of the page, click “Edit".
- Adjust your settings for all meetings that will take place in your “Personal Meeting Room" and click “Save” at the bottom of the page. Tip: In particular, next to “Security”, you might want to check the “Waiting Room” box so that people can’t enter your “Personal Meeting Room” unannounced, i.e. essentially requiring them to “knock first”.
STEP 3: Create your Appointment Slots in Google Calendar
- Visit Google Calendar and sign in with your myUSF account: https://calendar.google.com
- Click the “+ Create” button.
- Click “Appointment slots”.
- Click “More options”.
- Define your appointment slots, but don’t click “Save” yet. You might find Google’s instructions helpful.
- Paste your Zoom “Personal Link" (that you copied earlier) into the “Location” field.
- Notice the hyperlink titled “This calendar’s appointment page”. That’s the URL to your appointment page for your Google Calendar. Share this link with anyone you’d like to be able to book the appointment slots you’ve defined. Click it and take a moment to see what your registrants will see. You might also want to bookmark it in your browser so you can quickly copy and paste the URL.
- Click “Save”.
To wait inside your Personal Meeting Room
for GUESTS to arrive for their appointments:
First you need to enter your Personal Meeting Room:
Option 1:
- Open your Personal Link using your favorite web browser. (You might want to add it to your bookmarks for easy access.)
- If instead of the "zoom.us" app launching, you see a webpage with the message, "When system dialog prompts, click Allow”, simply click the link below that message on the same webpage to “launch meeting”.
- The "zoom.us" app will launch.
- If prompted, sign into the app:
- Click on the “Sign in with SSO” option.
- Enter “usfca" as the prefix for the “company domain," i.e. the full domain should read "usfca.zoom.us".
- Authenticate with your myUSF username and password.
- You'll automatically enter your Personal Meeting Room.
Option 2:
- Launch the “zoom.us” app. (On a Mac, it’s in your Applications folder).
- If prompted, sign into the app:
- Click on the “Sign in with SSO” option.
- Enter “usfca" as the prefix for the “company domain," i.e. the full domain should read "usfca.zoom.us".
- Authenticate with your myUSF username and password.
- Once you’re signed into the app, click on “Meetings” in the row of icons along the top of the window.
- On the left side of the window, click on “Upcoming".
- Below that, click on the entry for your “Personal Meeting ID (PMI)”.
- Click “Start".
Once you’re inside your Personal Meeting Room, if you have your Waiting Room enabled, you’ll be notified with a pop-up at the top of the window when someone enters it. If you’d also like to hear a sound, you’ll need to enable a setting:
- Click “Participants” in the row of icons at the bottom of the meeting window.
- At the bottom of the participants pane on the right, click “More".
- In the drop-down menu, select “Play Sound When Someone Joins/Leaves”.
To make that setting the default setting for all of your Zoom meetings:
- Visit the USF Zoom webpage: https://usfca.zoom.us
- Near the top of the page, click “SIGN IN”.
- On the left side of the page, click “Settings”.
- Near the top of the page, click “Meeting”.
- Scroll down to the group of settings titled “In Meeting (Basic)”.
- Enable the option "Sound notification when someone joins or leaves”.
To wait outside your Personal Meeting Room
for GUESTS to arrive for their appointments:
If you’d rather wait outside your Personal Meeting Room for people to arrive for their appointments, you can choose to be notified via an e-mail when they arrive. The e-mail you receive will include a convenient button to quickly enter your Personal Meeting Room:
- Visit the USF Zoom webpage: https://usfca.zoom.us
- Near the top of the page, click “SIGN IN”.
- On the left side of the page, click “Settings”.
- Near the top of the page, click “Meeting".
- Scroll down to the group of settings titled “Email Notification”.
- Enable the option "When attendees join meeting before host”.
5/14/2020
for A+A faculty and staff
This can be tricky even in the simplest of setups. Here are a handful of suggestions / insights that might help:
-
Get close(r) to the mic: The closer you are to your microphone, the better it will pick up the sound of your voice, and the higher the sound quality will be on the receiving end.
-
Specify your audio input (microphone) and output (speaker/headphone) devices: If you have multiple audio input (microphone) or output (speaker/headphone) devices connected to your laptop, take care to tell your computer which ones you want to use.
For example, most laptops have a built in mic, so if you connect a microphone to it, you now have two microphones. (Some external webcams have built-in mics, so you might even have three mics!) Another example: if you connect your laptop to a classroom A/V system via HDMI, you now have two speaker systems — your laptop’s built-in speakers and the A/V system.
To set your input and output devices on a Mac:
- System Preferences... > Sound > Output > Select a device for sound output:
- System Preferences... > Sound > Input > Select a device for sound input:
- Shortcut: you can quickly set these by holding down the [option] key and clicking the volume icon in your menu bar.
To complicate matters a little bit, Zoom will let you specify different input/devices than you’ve set at the system level: zoom.us > Preferences… > Audio
-
Microphone power: If you’re relying on the mic built into your laptop, this isn’t a worry, but some external microphones require power to function. For example, some require batteries that you insert into the mic and others get power via a USB cable connected to your computer. Some microphones also have an on/off switch and will only function when turned “on”.
-
Microphone input level/volume: This controls the overall “sensitivity” or “loudness" of your mic. How you set this will depend on your speaking volume, your distance from the mic, and the acoustics of the room.
You may have to set this setting in multiple places: at the computer level and within the application you’re using. On a Mac, you set your mic’s overall input level in System Preferences > Sound > Input > Input Volume. In Zoom, you can set this setting in zoom.us > Preferences... > Audio > Input Volume. In the case of Zoom, it just so happens that the system and application settings are linked, but this might not be the case in other apps.
There’s another audio setting in Zoom that impacts mic input level: “Automatically adjust microphone volume." You might want to uncheck that box for greater control over your mic’s input level.
-
Multiple volume controls: Like microphone input level, output volume may have controls in multiple locations.
For example, let’s say you’re watching a YouTube video in your web browser. First, you can adjust the overall volume of your computer. Second, you can adjust the volume within the YouTube video's control bar. Third, if you have external speakers or headphones connected, you might be able to adjust their volume, too. Fourth, many web browsers nowadays have a mute function in the form of an icon in the menu bar. All of these volume levels may be independent of one another.
In the case of Zoom, the application and system volume controls happen to be linked, i.e. the output volume in Zoom is linked to the output volume of your computer, so if you’re only using your laptop speakers, this is less of a worry.
-
Do a “sound check” at the start of class: Take a few minutes at the start of class to speak a few sentences and then ask students to raise their hand if they can’t hear you. Then have each of them say something, maybe their name as a way to take attendance. I’m not a teacher, so this may be a terrible idea; I’m just thinking out loud. My point though, is that if you do a “sound check" at the start of class, it might prevent interruptions during class.
I imagine that it might take a few class meetings before everyone has their “setup” worked out. Again, I’m not a teacher, but I imagine it’s the nature of the beast when it comes to remote instruction.
In summary, if a student is having trouble hearing you or you’re having trouble hearing them, here’s what to check on your end and on their end:
- If using an external mic, does it require power and is it turned on, if necessary?
- Select or verify your audio input/output devices - both system-level and application-level settings
- Set/check microphone input level/volume - both system-level and application-level settings
- Set/check computer-level volume control
- Set/check distinct speaker, headphone, or A/V system volume control (if available)
- Set/check distinct application-level volume control (if available)
4/9/2020
for A+A students, faculty, and staff
If you're leaning heavily on your personal ink-jet printer for your project work during the pandemic, these nine tips might help you achieve higher quality prints from your printer than you ever thought you could:
- Use name-brand ink.
Yes, name-brand ink from the likes of Epson, Canon, or HP is expensive. So it’s tempting to buy significantly cheaper “generic,” “compatible,” or “remanufactured” ink cartridges. I recommend against it. In my experience, when it comes to ink cartridges, “you get what you pay for.” You rarely see the same color accuracy, and low quality inks have the potential to damage your printer.
- Print a nozzle check pattern.
Verify that your printer is in tip-top shape by printing a nozzle check pattern to test for clogged ink nozzles. Consult your printer’s manual for instructions. Most commonly, the printer will print a series of patterns on a single sheet of ordinary paper, and then you'll look for inconsistencies in the pattern.
Tip: If you don’t use your printer on a weekly basis, printing a nozzle check pattern once a week is a great way to keep the innards of your printer in good working order.
- Clean the print head, if necessary.
If the nozzle check pattern isn’t pristine, run a print head cleaning routine. All ink-jet printers include a way for you to do this. Consult your printer’s manual and follow the instructions.
After running a head cleaning routine, I recommend printing a nozzle check pattern to see if the cleaning routine was successful. If it wasn’t, run a second head cleaning routine and print another nozzle check pattern. If it still wasn’t successful, let your printer sit overnight, and try again the next day. Why wait?: Head cleaning routines use fresh ink to dissolve dried ink, and sometimes it helps to let the dried ink soften overnight. And since ink is expensive, you want to run as few cleaning routines as possible.
- Run a print head alignment routine.
If you've never run a print head alignment routine on your printer, or if you last ran one more than couple of years ago, or if you’ve ever significantly jostled your printer, or if you’ve ever moved your printer from one place to another via plane, train, or automobile, you should run a head alignment routine.
Most ink-jet printers include some way for you to do this, and the process varies among manufacturers and between models. Most commonly, the printer will print a series of patterns on ordinary paper, and then you'll select the patterns that look the most aligned and register them in the printer’s settings.
- Use high quality paper that’s compatible with your printer.
The quality of the print is directly proportional to the quality of the paper. Plus, your printer was designed to print to a specific array of paper thicknesses and finishes (glossy, semi-gloss, matte, luster, etc.). Consult your printer’s manual to learn the types of paper, a.k.a. “media”, that it can accept.
For best results, use high quality paper produced by the same manufacturer as your printer, e.g. Epson brand paper for Epson printers or Canon brand paper for Canon printers. It’s not required, but it will greatly increase the probability that you’ll achieve a high quality print.
If you choose to use non-name-brand paper, it’s wise to verify that the paper you're using isn’t thicker, thinner, or glossier than your printer can handle. Compare the thickness, weight, and/or finish of your paper to the specifications of the compatible name-brand paper types listed in your printer’s manual.
- Load your paper properly.
Some ink-jet printers have multiple paper feed sources. For example, my personal Canon printer requires me to load thicker paper in a slot in the back, while ordinary paper can be loaded in a tray or “cartridge” in the front. Consult your printer’s manual and look closely at the print settings when you select File > Print to make sure you’re loading your paper in the correct location.
In addition, unless your paper is explicitly labeled as "double-sided" ink-jet paper, it has a "print side" and a "non-print side”. Consult your printer’s manual to ensure that you orient your paper correctly when you load it, usually either “print side up” or “print side down”.
- Select the correct "Media Type" in your print settings.
Neglecting this step causes the vast majority of print quality issues. All ink-jet printers require you to specify the type of paper or "media" that you've loaded into the printer. Remember, your printer is no smarter than a toaster. It has no idea whether you've inserted thin paper, thick paper, glossy paper, matte paper, or your friend's history paper. You must ALWAYS specify the type of paper in the print settings. If you don't, you may see "banding", "streaking", or "off" colors.
- Crank up the “Quality” in your print settings.
After setting the media type, look for a “print quality” setting and crank it up to eleven. Most ink-jet printers have this setting nested somewhere in the print settings, and it often defaults to “medium” quality.
Tip: You’re likely to see different print quality choices when you select different media types in your print settings, and typically, the highest possible quality setting is only available when using high quality media types.
- Remember the nine "steps to a successful print job".
Ink-jet printing is a meticulous, manual, and occasionally tricky process that's not entirely bug-free. It's not as simple as selecting File > Print and then clicking [OK]. If you run into problems, take a deep breath, and review the nine "steps for a successful print job” on this webpage. If you're still having problems, reboot both your computer and your printer and try again.
3/31/2020
for A+A faculty and staff
Late last week I stumbled upon this, so I thought I’d share:
If you launch the Zoom app separately (the app that’s inside your Applications folder on a Mac), outside the context of starting or joining a Zoom meeting, and then log into it by selecting the “Sign In with Google" option and entering your myUSF credentials, you’ll see a different interface and a bunch of additional features.
Browse the “getting started” guide on the Zoom website for an introduction to these features. For example, among other things, I was intrigued to learn that you can…
- …see the current Zoom status of all USF faculty and staff
- …start a one-on-one Zoom call with someone (if they're logged into Zoom)
- …start a one-on-one text chat with someone (if they’re logged into Zoom)
- …add frequently used contacts to your Zoom account; if they’re USF faculty/staff, you can simply “star” them; if they’re students you can “invite” them
- …start an ongoing group chat called a “channel”
- ...start an ad hoc Zoom meeting with all of the members of a “channel” who are currently online
3/31/2020
for A+A students, faculty, and staff
Pandemic or no pandemic, whether you're working on a university computer, your personal computer, or a friend’s computer, it’s critical that you develop a routine for backing up your files.
If you don’t already have a backup routine, ask yourself: “If Steve took my computer right now and put it in the kiln outside XARTS for a few hours, how many files would I be able to recover after Sean locked Steve in the tool closet?” If that question induced any amount of anxiety (and not because of my hypothetical random act of vandalism), don’t worry: there are countless backup strategies you can employ; I’ve summarized a few of the easier ones to get you started:
(1) Easy and low cost: A folder and a flash drive: Keep all of your critical files in a single folder on your computer and copy that folder to a flash drive at the end of every work day. Append the backup date to the name of the folder on the flash drive. Delete previous backups from the flash drive as needed to free up space. Keep the flash drive in a secure location.
Pros: Easy, quick, and inexpensive.
Cons: Relatively limited backup capacity. You can only “go back in time” as far as your backup space permits. Manual process: you have to remember to do it.
Step up: If you find yourself running out of backup space or wanting to keep more incremental backups, follow the same procedure, but use a larger (and typically pricier) external hard drive instead of a flash drive.
(2) Easy and medium up-front cost: Time Machine: Every Mac has a built-in “set it and forget it” backup system called “Time Machine”. All you need to get started is an external hard drive, ideally one that's at least as large as the drive inside your Mac. After configuring Time Machine to use your drive for backups, your Mac takes care of the rest. You can choose when, and for how long, to connect the drive each day or simply leave it connected all the time. Keep the drive in a secure location when not connected to your computer.
Pros: Easy. Low maintenance. Low fuss. Automatic. Backs up everything on your Mac in the background while you work. Creates "incremental backups" so you can go back to various points in time to recover different versions of a file. The larger the drive, the further “back in time” you can go. Can back up your entire computer if your drive is large enough, not just specific files.
Cons: The drive must be connected to your computer in order for backups to occur. Partially manual process: if you don’t leave it connected all the time, you have to remember to periodically connect the drive.
(3) Easy and free: Google Drive: Everyone at USF has a cloud drive with unlimited storage in the form of Google Drive. You can manually copy files to it via a web browser or install "Google Drive Backup and Sync” to semi-automate the process.
Pros: Off-site, “in the cloud” backup secured by the gargantuan Google infrastructure. Unlimited storage for myUSF Google accounts. If using syncing, exact copies of your files are backed up automatically to the cloud, while you work. Theft and disaster-proof: your backup device isn't in the same vicinity as your computer.
Cons: Slow. High speed Internet access required. Files cannot be recovered without an Internet connection. Web version cumbersome to use with very large files. Automatic sync function doesn’t provide incremental backups, so there's no “going back in time”. Manual process for incremental backups similar to option (1) above.
(4) Advanced (and typically more expensive) strategies:
- For greater resilience and/or peace of mind, consider a subscription service like one of these that automatically backs up your computer to "the cloud”, in the background, while you work.
- Time Machine can also work with a network attached storage device, or “NAS” device for short, that’s connected to your home network. Then you get all the benefits of Time Machine without having to remember to connect the drive to your computer. Here’s a rundown of some popular NAS devices.
- You might also consider employing multiple backup strategies, for example a “local” backup source in your home or office for quick and easy access, plus a second off-site or cloud-based backup to protect against theft or natural disaster.
3/25/2020
for A+A students, faculty, and staff
Fonts are cool. We all love fonts. We all want aaaaaaallll the fonts and we want them now and we want them in every flavor: italic, bold, demibold, condensed, extended, orange, strawberry, lemon, lime, etc...
Most high quality fonts aren’t free, and they're licensed just like software. They're also one of the few remaining varieties of "digital property" that don't have some form of digital rights management (or DRM) built into them to protect them from unauthorized use. For that reason, fonts are very easy, and very tempting, to… “borrow". "That computer has a font I like. My computer doesn’t have that font. Ergo, I’ll copy that font from computer ‘A' to computer ‘B’."
Unless you personally own both computers, and you paid for the font, and the license permits you to install it on another computer, that’s not “borrowing"; it's software piracy, and it’s illegal.
So what can you do when you need a font that you don’t have? Pay for the font. You might be surprised by how affordable a single license of a font can be. I’m not going to sugar coat it: some fonts are really, really expensive, but most aren’t. Here are a few font-shopping tips:
- The same font might be produced by multiple “foundries”, which, in turn, might be sold by multiple “resellers”, sometimes at drastically different prices, so it pays to shop around.
- If you need more than one variant of a font (bold, italic, etc.), it can be more affordable to purchase the entire font “family” rather than purchase the individual variants.
- Some resellers offer discounts to students and educators; search their FAQ pages or e-mail them to inquire. It’s not always advertised.
Here are some of the more popular online font resellers:
- Fonts.com
- MyFonts.com
- TypeNetwork.com
- Typography.com
3/24/2020
for A+A students, faculty, and staff
We’re all leaning on our personal or company-issued computers more than we’ve ever needed to before. I’ve written up five easy steps you can take to (potentially) boost the performance of your computer:
- Plug in: Many modern laptops intentionally "slow down" when not plugged in to preserve battery power (by throttling CPU and/or GPU speed, for example.) So whenever possible, “plug in!”
- Close applications: If you’re not actively using an application, quit it. Oftentimes, just closing all of an application’s open windows isn’t enough; you need to quit the whole application. Only keep those applications running that you’re actively using. (Tip: To quickly visualize all of the applications currently running on a Mac, hold down [command] and press the [tab] key to bring up the application switcher.)
- Close browser tabs: Some modern websites can tax a computer as much as a full-blown application. Each tab that you leave open in your browser is like another application running in the background, using up system resources. Close browser tabs you’re not actively using.
- Free up disk space: Computers perform better when they have lots of free internal storage, a.k.a. disk space. Think of free internal storage as “breathing room” for your operating system. (Tip: To quickly visualize how much free space you have on a Mac, select “About This Mac” from the Apple menu and click the “Storage” tab.) If you’re low on internal storage, here are the quickest ways to reclaim some:
- delete applications you no longer use (most can easily be reinstalled if/when you need them)
- empty your Downloads folder (if you downloaded it once; you can usually download it again)
- turn off local syncing for your Drop Box or Google Drive services and delete local copies of files (verify that it’s all still “in the cloud” first)
- empty your browser cache(s):
- Safari: Safari > Preferences…. > Privacy > [Manage Website Data…]
- Firefox: Firefox > Preferences… > Privacy & Security > Cookies and Site Data > [Manage Data…]
- Chrome: Chrome > Clear Browsing Data...
- Throttle or shut down other devices in your home: Count the number of devices in your home that are connected to your Wi-Fi network. The number might surprise you. During hours when you need peak Wi-Fi performance, consider disconnecting some, shutting some down, or limiting how some of them are used (no video streaming on other devices during certain hours, for example).