Frequently Asked Questions (FAQ)
APPLIES TO: All XARTS classroom computers, Mac
ADDED: Fall 2022
ISSUE: Menus in Adobe InDesign might occasionally become slow to respond, making it difficult to navigate the menu system and select menu commands.
WORKAROUND: Close all open InDesign files, quit Adobe InDesign, then relaunch Adobe InDesign. The menu system should respond normally again.
CAUSE: The cause is unknown. Since it's intermittent, and doesn't affect all users on all computers, we suspect it's a bug in InDesign that will be fixed in a future update. It could be connected to how long InDesign has been running, the number of files you've opened and closed during your work session, or perhaps even the content/layout of the files themselves. We don't know.
APPLIES TO: All XARTS classroom computers, Mac
ADDED: Fall 2021
POSSIBLE ISSUE: When you launch Zoom for the first time on a classroom computer, the app asks for permission to use the microphone and the camera. You confirm by clicking "OK" to both prompts, but the camera and/or mic might not respond when you start or join a Zoom meeting.
SOLUTION: Log out of the computer and log back in. Zoom will now be able to access the camera and microphone. The issue will not recur on subsequent logins to the same computer (as long as your files and settings are preserved).
CAUSE: The cause is unknown. In my observation, it happens during about 20% of first-time logins to a classroom computer.
APPLIES TO: Green Lab, Micro-Lab in Koret Studio, Windows
ADDED: Fall 2018
When you attempt to print to the “Adobe PDF” printer from Revit, the progress bar may stop, forcing you to cancel the operation. Research suggests that this has been an “on again, off again” issue between Adobe and Autodesk over the course of many years and many versions of Revit. Currently, workaround option #2 in this Autodesk support article seems to fix the problem on our lab computers:
Workaround:
- Navigate to Start > Settings > Devices > Printers & scanners > Adobe PDF > click [Manage]
- Click on "Printing Preferences" for the Adobe PDF printer.
- In the "Printing Preferences" dialog, click the "Adobe PDF Settings" tab.
- Next to "Adobe PDF Output Folder", select or browse to a specific folder where you want all of your PDFs to be created. Make sure that "Prompt for Adobe PDF filename” is NOT selected.
- UNCHECK the box next to "Rely On System Fonts Only; Do Not Use Document Fonts”.
- Click OK.
Important Notes:
- This workaround must be applied “per user, per computer”, i.e. you must remember to apply it to each lab computer you log into.
- These settings will apply every time you print to the Adobe PDF printer, no matter what application you’re using.
APPLIES TO: Mac
ADDED: Fall 2018
PROBLEM: You try to log out. You're prompted to save any unsaved files and open applications appear to quit as usual, but then the computer doesn't log out.
CAUSE: One or more applications may be still running, refusing to automatically quit, thus preventing the computer from logging out. If you see a dot under an application in your Dock, then it's still running.
SOLUTION: For each application that's still running, click on its icon in your Dock and then select [Application Name] ➔ Quit in the menu bar at the top of the screen. Once you've manually quit all of these applications, the logout sequence will continue.
APPLIES TO: Blue Lab, Orange Lab, Green Lab, Mac, Windows
PROBLEM: When printing to one of the lab's Epson ink-jet printers, you see a "Communication Error" and the printer will not print.
SOLUTIONS: Try each of these solutions, in order, until the error goes away and printing resumes:
(Solution 1) If printing over USB, disconnect the printer's USB cable from the computer, count to five, and then reinsert it into the same port.
(Solution 2) If printing over USB, disconnect the printer's USB cable from the computer, count to five, and then reinsert it into a different port on the computer, preferably a vacant port on the back of the computer.
(Solution 3) Turn off the printer, count to ten, then turn the printer back on.
(Solution 4) Turn off the printer, log out of the computer, log back into the computer, then turn the printer back on.
APPLIES TO: Blue Lab, Orange Lab, Green Lab, Mac
PROBLEM: When printing from InDesign, your file prints in grayscale instead of color to a lab ink-jet printer.
CAUSE: After selecting File ➔ Print in InDesign and then selecting one of the labs' SureColor ink-jet printers in the "Printer:" drop-down menu, InDesign may incorrectly set these default print settings:
(a) The "Color:" setting in the "Output" pane incorrectly defaults to "Composite Gray", but should default to "Composite RGB".
(b) The "Printer Profile:" setting in the "Color Management" pane incorrectly defaults to no selection, but should default to "Document RGB".
SOLUTION: In the "Printer:" drop-down menu, temporarily select a different printer, and then reselect the printer you want to use. The default settings will now be correct.
MORE INFO: This appears to be a bug in InDesign, and in my testing, does not occur in Illustrator or Photoshop.
APPLIES TO: Blue Lab, Orange Lab, Green Lab, Mac, Windows
ADVISORY: For optimal color matching between your screen and an Epson inkjet printer in Adobe applications, set these three settings in addition to your usual print settings:
- Specify that the Adobe application should manage colors in the Adobe print dialog box.
- Select a "Printer Profile" in the Adobe print dialog box.
- Manually turn off the printer's color management in the printer driver dialog box.
Here's how to do all of the above on a Mac:
- Select File ➔ Print. The Adobe print dialog box opens.
- Select the printer in the "Printer:" drop-down menu.
- Click once on "Color Management".
- In the "Color Handling" drop-down menu, select the option specifying that the application should manage colors:
- In Photoshop, select "Photoshop manages colors".
- In Illustrator, select "Let Illustrator determine colors". (This is the default / only option.)
- In InDesign, select "Let InDesign determine colors". (This is the default / only option.)
- In the "Printer Profile" drop-down menu, select a profile that best matches the printer and the paper you're using. Tip: For the Epson SureColor P800 printers in our computer labs, all of the profiles start with "SC-P800".
- Adjust any other settings for your print job in the Adobe print dialog box.
- Now open the printer driver dialog box:
- In Photoshop, click the [Print Settings...] button.
- In Illustrator, click the [Setup...] button.
- In InDesign, click the [Printer...] button.
- Click the "Layout" drop-down menu and select "Print Settings".
- In the "Color Settings:" drop-down menu, select "Off (No Color Adjustment)".
- Adjust any other settings for your print job in the printer driver dialog box, including the all-important "Media Type" setting that you should always specify any time you print to an ink-jet printer from any application.
- Click the [Print] button to close the printer driver dialog box and return to the Adobe print dialog box.
FOR MORE INFORMATION: Reference these support pages on the Adobe website:
APPLIES TO: All XARTS classroom computers, Mac
PROBLEM: While you're using Photoshop after launching it for the very first time on a given computer, the mouse pointer becomes a "spinning pinwheel" and the application becomes unresponsive.
SOLUTION: Wait for the spinning pinwheel to revert to a mouse pointer. Be patient; this can take up to 60 seconds. If you wait, this "freeze" will not happen again during subsequent launches of Photoshop on that lab computer. Do not succumb to the temptation to "force quit" Photoshop when this happens. If you do, it will just happen again the next time you launch it.
NOTE: This is a "per computer" advisory. It will apply separately to each lab computer you log into.
CAUSE: The cause is unknown, but it's common for large, complex applications to "initialize" themselves, i.e. do a bunch of stuff in the background, the first time you launch them. (Or it might be a "bug" that Adobe will fix with a future update.)
APPLIES TO: All XARTS classroom computers, Mac
- While in the Finder, navigate to any file of the type in question.
- Click once on the file and select File ➔ Get Info.
Tip: The shortcut for this command is [Command] + [ I ]. - In the "Get Info" window that appears, expand the "Open with:" section if necessary. Do this by clicking on the small triangle next to the heading.
- In the drop-down menu below "Open with:", select the application you want to use to open files of this type. (If you don't see the application in the list, select "Other..." to open the "Choose an Application" dialog box so that you can navigate to the application you want. Find and double-click it's name.)
- Now click the [Change All...] button in the "Get Info" window. You'll receive a prompt asking you if you're sure you want to do this. Just click [Continue].
- From now on, double-clicking any document of the same type opens it in the newly selected application.
APPLIES TO: All XARTS classroom computers, Mac
Option 1 – The Dock - Click and drag a folder or file to the right of (or below) the line in the Dock and then release the mouse button. (Only application icons go to the left of (or above) the line in the Dock.) Now you can just click the folder in the Dock to access its contents.
Option 2 – The Sidebar - Click and drag a folder to a position under the Favorites category in the Sidebar of any open Finder window and then release the mouse button. (The Sidebar appears in the left column of your Finder windows.) Now you can just click the item in the Sidebar to reveal it’s contents in the Finder window.
Option 3 – The Desktop – Click once on folder or file to select it, then press and hold the [Command] + [Option] keys while you drag the item to your Desktop. Release the mouse button then release the keys. You have now created an “alias” to that item on your Desktop. (The small arrow in the lower left corner of the icon indicates that the icon is an alias to an original item stored elsewhere.) Double-clicking on the alias is just like double-clicking on the original folder or file.
Option 4 – In Another Folder – Follow the steps in option three, then move the alias you created to another convenient location on your hard drive. For example, you might create a folder called “Instructors” in your own home folder on a lab computer and then put aliases for each of your instructors’ XARTS Network Drives or Drop Boxes into it.
APPLIES TO: Blue Lab, Orange Lab, Green Lab, Micro-Lab in Koret Studio
Our current network drive storage limits are documented in the XARTS Network Drive section of the Lab User Manual.
APPLIES TO: All XARTS classroom computers, Mac
Option 1 - OmniDiskSweeper
- Launch OmniDiskSweeper. It's inside the folder Applications > Utilities.
- To scan your local home folder, select File > Size Home Folder. If you're in a lab, to scan your XARTS Network Drive, select Tools > Drive List. In the window that appears, expand the Network folder, click once on your XARTS Network Drive (it has the same name as your myUSF username), and then click the Sweep Selected Drive... button.
- The largest folders will be grouped together at the top of the list on the left side of the window. Click on a large folder to see which subfolders and files inside it are large, and so on...
- Continue browsing this way to locate the files and folders that are occupying the most disk space. TIP: Click once on the folder button in the bottom, right corner of the results window to reveal that file in the Finder.
Option 2 - The Finder
- Log into any lab computer.
- In the Finder, select Go > Home (for your Home folder on the lab computer) or double-click on your XARTS Network Drive icon on your Desktop. (Your network drive's name is the same as your lab account's user name.)
- Select View > as List.
- Select View > Show View Options.
- In the options window that appears, enable the option, “Calculate all sizes.”
- Close the options window.
- If you can’t see the “Size” column in the window, expand the size of the window. You may find it useful to reorder the columns in the window so that the “Size” column is further to the left. To do so, just click and drag the column titles.
- Wait a minute, or so, for the size of each folder to be calculated.
- Click once on the “Size” column’s title to sort the window contents by size.
- The largest folders will now be grouped together. Expand one or more of them to see which subfolders inside each folder are the largest, then expand the largest subfolders, and so on…
- Continue browsing in this way to find the files and folders that are occupying the most disk space.
If the user name and password fields "shake" when you try to log in:
- Eliminate human error: Are you absolutely certain you entered your myUSF user name and password correctly?
- Perhaps you recently changed your password.
- Passwords are case-sensitive, so make sure the [caps lock] key isn't enabled.
- Make sure there are no extraneous, invisible spaces in the user name or password fields. Tip: A quick way to do this is to click anywhere in the user name field, press [command] + [A] to select the entire contents of the field, and then press the [delete] key. Repeat these steps with the password field. Now try entering your user name and password again.
- Verify the network connection: Do you see a red dot in the user name field? If so, the computer may have lost its network connection. Verify that the Ethernet cord is connected snugly to the back of the computer and to the port under the desk.
- Reboot: If at first you don't succeed, reboot by clicking the "Restart" button near the bottom of the login screen. This simple step can solve a multitude of computing woes, including login issues.
- Change your myUSF account password: Sometimes changing your myUSF account password will "kick start" your account and fix your login issues. Change your myUSF account password »
- Ask the ITS Help Desk for help: There may be something amiss with your myUSF account that only USF Information Technology Services (ITS) can solve. View ITS Help Desk hours and locations »
APPLIES TO: Blue Lab, Orange Lab, Green Lab, Micro-Lab in Koret Studio
If you don't qualify for full lab access, then you'll have guest lab access when you log into a computer in XARTS Labs. Learn more about account access levels »
APPLIES TO: Blue Lab, Orange Lab, Green Lab, Micro-Lab in Koret Studio
UPDATED: Spring 2020
You may need to cancel the current print job on a lab laser printer when...
- ...a lab user prints a document that specifies a paper size other than letter (8.5" x 11") or tabloid (11" x 17"), so the printer pauses to wait for someone to manually feed the odd-sized paper, preventing other print jobs from going through.
- ...the current print job has paused the printer or significantly delayed the queue for some other reason, e.g. the print job is unnecessarily large or generating an error message on the printer.
Here's how to do it:
- Pivot the control panel upward so that you can see it better.
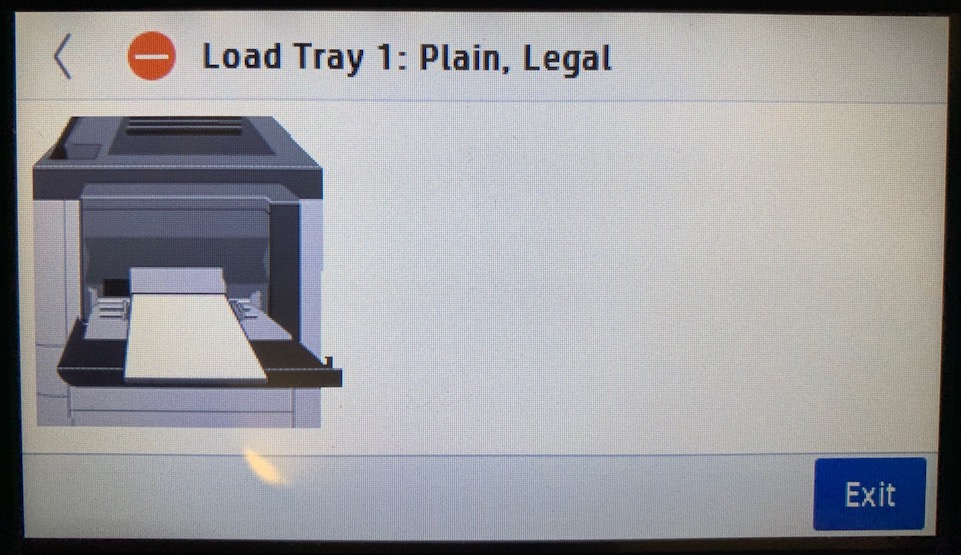
- If an alert screen is on the control panel, such as "Load Tray 1", touch the [Exit] button to dismiss it. (See image A below.)
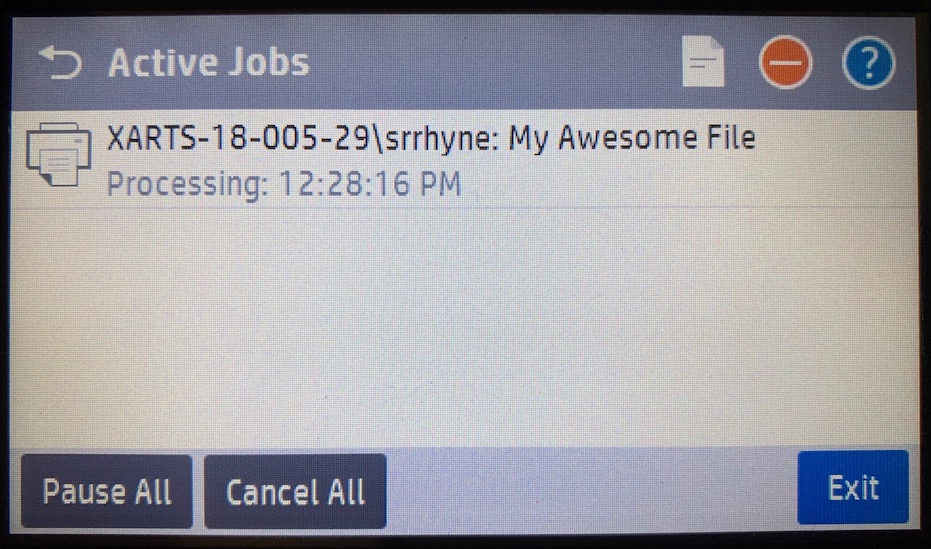
- Click the Active Jobs icon near the top right corner of the screen. It looks like a piece of paper.
- In the list of print jobs that appears, touch the problematic print job. It will most likely be the print job at the top of the list with the oldest date/time. (See image B below.)
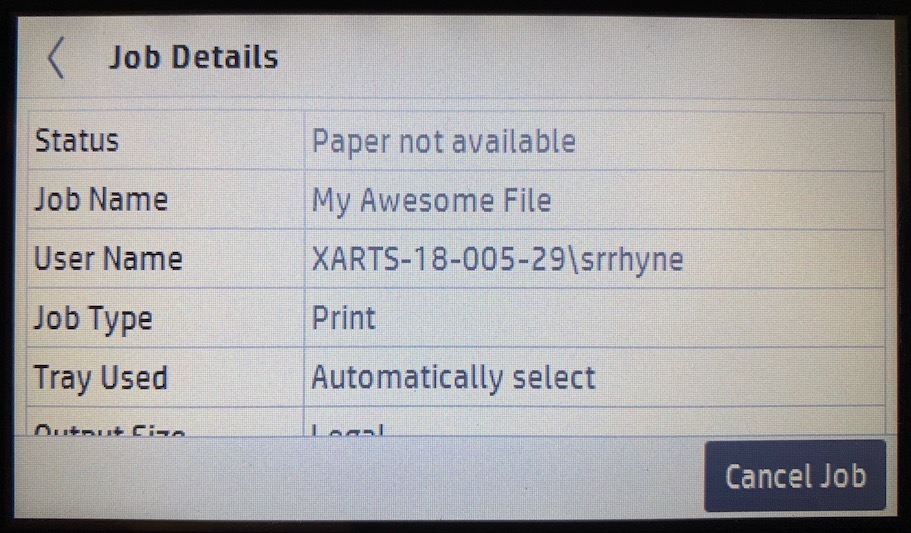
- Next to Status, note the reason for the problem, for example, "Paper not available." Next to Job Name, note the name of the file being printed. Next to User Name note both the computer number and the user name of the person who printed it. If that person is still in the room, you might want to let them know that you're about to cancel their print job. (See image C below.)
- Once you're certain that you've identified the correct print job, touch the [Cancel Job] button. (See image C below.)
- Touch the [Yes] button to confirm that you want to cancel the print job.
- The control panel will return to the home screen automatically after 10 seconds, but you can also touch the illuminated Home button on the left side of the control panel to return to the home screen immediately.
- Pivot the control panel back down to its flat position.